


Using a chemical inductor is an effective way to add chemicals into a mix load for a sprayer. At Dultmeier Sales, we assemble a variety of cone-bottom inductor tanks with Venturi assemblies that ensure precise and efficient chemical mixing.
In this article, we'll provide a complete guide on how chemical inductor systems work, covering everything from the principles behind the Venturi effect to the detailed operation of these systems. Whether you're new to using chemical inductors or looking to optimize your current setup, this guide will equip you with the knowledge you need.
How a Chemical Inductor Works
The Venturi effect is the driving principle behind how a chemical inductor works. The Venturi effect occurs when a fluid flows through a narrow constriction, causing its velocity to increase and its pressure to decrease, creating a low-pressure zone that can generate suction. This happens in a chemical inductor when the carrier from the transfer pump flows into the inductor assembly on the bottom of the inductor tank.
The suction effect draws the chemical from the inductor tank into the flowing water. As the chemical mixes with the water in the Venturi nozzle, the combined solution is then transferred into the main sprayer tank or nurse tank.
This process not only requires a specific set of components but also the correct plumbing to work effectively. Let's examine each component and how they work together.
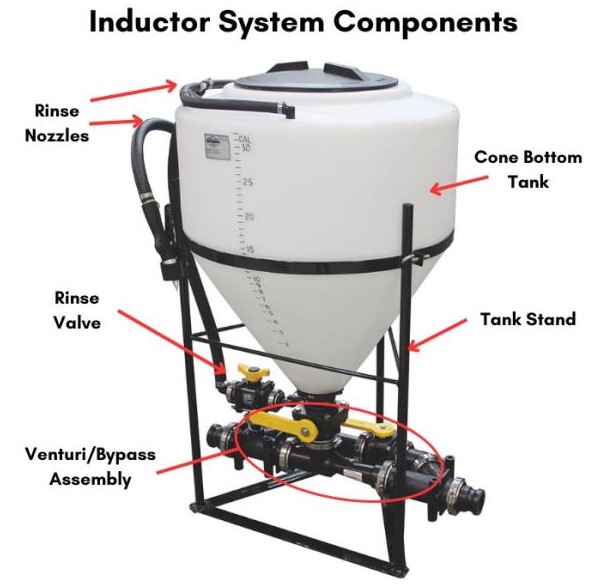
Chemical Inductor Components
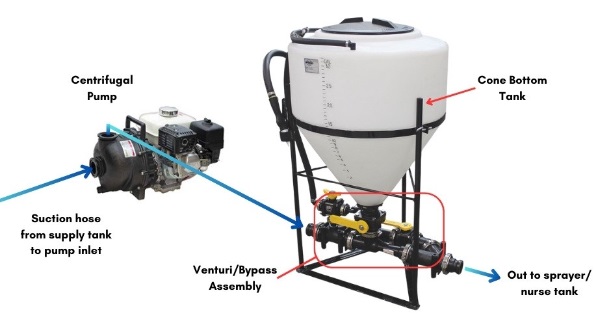
Whether a chemical inductor system is on-board a sprayer, mounted on a tender trailer, or stationed on the ground, the core components are the same:
- Venturi/bypass assembly
- Cone bottom tank
- Hose/plumbing
- Centrifugal transfer pump
There are variations of each component depending on the specifics of the application.
Venturi/bypass Assembly
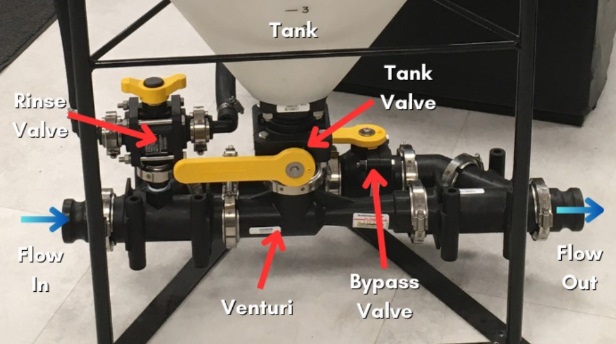
The venturi bypass assembly is the critical piece of any chemical inductor system and essential to drawing in agrochemicals, AMS, crop oil, etc. into your final mix load. This assembly includes the venturi, bypass valve, and all appropriate plumbing fittings. When the bypass valve is closed water is forced through the venturi. Then the tank valve can be opened, and the contents of the inductor tank are drained by the suction from the venturi.
When the bypass valve is open, water avoids the venturi and the flow rate is faster, but there is no suction to pull any mix of liquids or chemicals from the tank.
If you are building a chemical inductor, you can add a venturi assembly to an existing cone bottom tank. You can also use a venturi/bypass assembly to pull chemicals directly into a carrier line without the cone bottom tank. For more information be sure to read this guide to mixing chemicals without 12-volt pumps.
Inductor Tank
A cone-bottom polyethylene tank is recommended for use with agrochemicals (pesticides, herbicides, fertilizers, etc.) because it offers a wide range of chemical compatibilities. They are available in various sizes, commonly 15 to 110 gallons. The size of your inductor tank does NOT affect the rate at which chemicals are drawn into your mainline. A larger tank simply holds more product. The tank opening on the bottom of the tank, however, is important to consider. A smaller tank opening can restrict the induction rate and make your overall operation less efficient.
The size of the tank lid also matters. For starters, a larger lid opening makes it easier to add chemicals and reduces the risk of spillage outside the inductor system. A larger 16-inch lid also allows you to use a Chem-blade jug emptying and rinsing system. With this accessory, you can quickly empty chemical jugs without opening them or pouring them.
On this page, you can see all our available cone bottom inductor tanks.
Plumbing/Hose
Like the tank, it is recommended that the valves and fittings are also poly. Polypropylene not only works best with agrochemicals but is also suitable for other products such as salt-brine, fertilizers, acids, and cleaning solutions.
EPDM rubber suction and discharge hoses, such as these offerings from Kanaflex (link) and TigerFlex (link) work great for the suction and discharge sides of your inductor system pump. Two- and three-inch hoses are common plumbing sizes used with inductors.
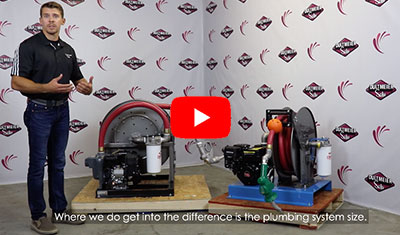
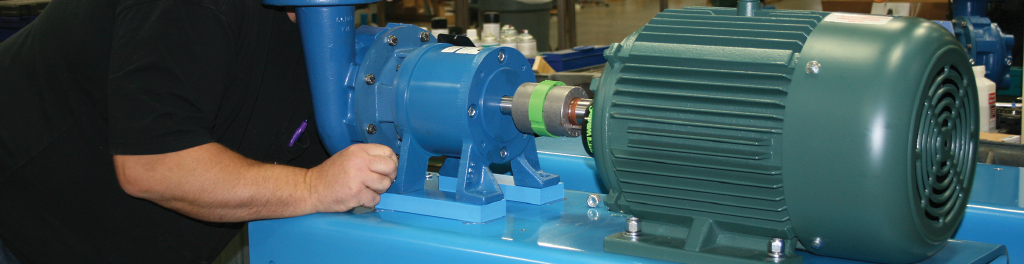
Transfer Pump
Although the pump is not an integrated part of the inductor assembly, it is a critical component required to make the system function. The inductor system must be used with a centrifugal transfer pump that is capable of pushing enough flow through the venturi to generate adequate suction. A general rule of thumb is to use a pump that matches the same size as your inductor's plumbing. So, use a two-inch pump with a two-inch inductor system, and a three-inch pump with a three-inch inductor system.
Additionally, you'll need to ensure the pump has adequate horsepower to move the liquid through the inductor venturi. If the pump lacks enough horsepower, the pressure may be too low, which can limit the amount of suction created. For example, when pumping water, a two-inch pump with a five-horsepower gas engine will suffice for a two-inch inductor setup. If you have a three-inch inductor assembly, then you typically need a three-inch pump with 8+ horsepower.
If your carrier is fertilizer or some other liquid heavier than water, you will likely need more horsepower to drive the pump. You can learn more about the pump sizes in our fertilizer transfer pump guide.
Pump Options for Chemical Inductors:
How to Install a Chemical Inductor System
Like the pump, the plumbing setup of an inductor tank is crucial. The most important aspect is the placement of the pump in relation to the inductor system. The inductor should be positioned on the discharge side of the pump. This placement is essential because the flow of the water pumped through the venturi creates the vacuum effect.
Using the right hose and fittings is vital to proper plumbing for inductor tanks. It is important to match the inside diameter of the hose and fittings with that of the pump ports. For example, a two-inch inductor system should have two-inch plumbing throughout. Hose, fittings, pumps, valves, venturi, etc., should also be two inches in diameter.
Any restriction in flow can disrupt the system's effectiveness. Eliminating as many bends or slowdowns within your plumbing will ensure your flow rate remains strong enough to draw product down through the venturi. Try to limit the length of hose on the suction and discharge sides of the pump and avoid using too many 90-degree elbows and strainers.
Furthermore, where you place your pump in relation to your system's water supply tank and inductor can affect the performance of the overall system. You will want to keep the pump as close to the water tank as possible, because the shorter the distance the water must travel to the pump, the less pressure loss you'll have and the better your pump will perform. Proper pump placement means a more reliable and effective chemical mixing process.
Since plumbing plays such a large part in the overall performance of your inductor system, it's important to consider how every part of the system works in tandem with one another. As referenced above, the hoses throughout your system need to be the proper size to the inductor unit.
This is also true for the pump inlet. A two-inch pump needs to be fed with at least a two-inch hose, a three-inch pump with a three-inch hose, and so on. You do not want to starve the pump or run it dry. This will result in seal failure in addition to the inductor not functioning properly.
Chemical Inductor Plumbing Diagram
Keys to Remember When Plumbing Your Inductor Tank:
- Venturi Assembly: Must be on the discharge side of the pump.
- Hose and Fittings: Match the inside diameter of your pump inlet and inductor.
- Flow Optimization: Avoid 90-degree elbows and pumping great distances 100 ft +
- Pump Placement: Keep the pump close to the supply tank for efficient operation.
- Pump Operation: Never run the pump dry and ensure supply tank valves are fully open.
Using an Inductor Tank Without a Venturi Assembly
While most chemical inductors utilize a venturi assembly, you can use a cone-bottom tank without a venturi assembly by placing it on the suction side of the pump. However, this setup requires careful consideration to avoid starving the pump of liquid, which can cause pump cavitation and damage.
One of the risks of positioning the inductor tank upstream of the pump is the possibility of air bubbles entering the system. When you open the tank valve, liquid in the tank is drawn into your carrier line, but you are also introducing air into the line. Air bubbles passing through the pump can lead to damage over time. A large amount of air can starve the pump and lead to seal failure rather quickly.
Placing the inductor on the suction side of the pump also means you have chemicals passing through your pump rather than just water. Although many pumps are compatible with agrochemicals, this will inevitably lead to more wear and tear compared to water alone.
You also have the risk of contaminating your water supply or water tank, though using a check valve between the water tank/supply and the cone bottom tank to prevent chemical backflow can likely eliminate this contamination risk.
Conclusion
When set up properly, inductor tank systems are a highly effective way to introduce multiple chemicals or fertilizers into your spraying application. Following these guidelines will help you build or improve your current set-up, ensuring efficient and reliable chemical induction for your sprayer.
Dultmeier Sales offers a complete inductor system in poly and stainless steel as well as all the components needed to operate them:

Tech Ag & Industrial Sales
Shane Blomendahl is a tech sales veteran at Dultmeier Sales with over 10+ years of experience in liquid handling products covering several industries and applications.