Air-operated double diaphragm (AODD) pumps are highly versatile, reliable devices widely used across various industries for handling viscous, abrasive, and shear-sensitive fluids. Powered by compressed air, these pumps use two diaphragms in a reciprocating motion to transfer liquid. With no need for electricity, these pumps offer a versatile option for hazardous and demanding environments.
AODDs: Basic Parts and Operation
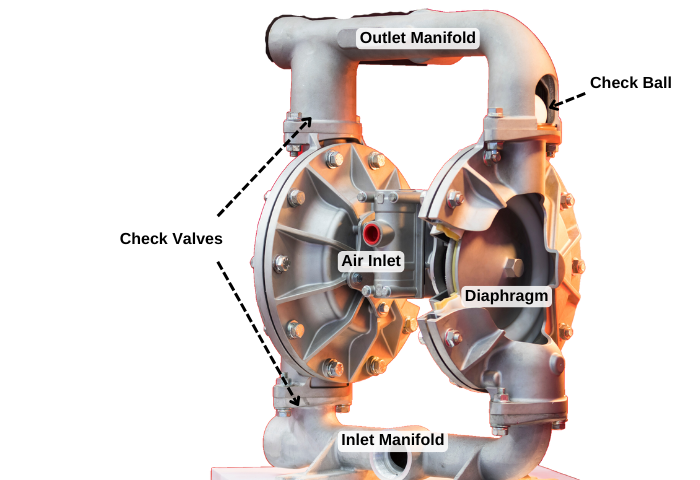
- Diaphragms: Located on either side of the pump, the diaphragms are flexible membranes typically made of materials like PTFE or rubber.
- Air Chamber: The air chamber (also known as the air valve chamber) is where compressed air is introduced to alternate between the two diaphragms.
- Inlet and Outlet Manifolds: The inlet manifold allows the fluid to enter the pump chamber, while the outlet manifold directs the fluid out of the pump after it has been moved by the diaphragms.
- Check Valves: Each diaphragm chamber has two check valves, one at the inlet and one at the outlet. These valves are responsible for directing fluid flow in a single direction. Typically a ball and seat style check valve.
- Valve Assembly (Air Valve): The air valve assembly, typically located in the center section of the pump, controls the distribution of compressed air to the diaphragms.
- Fluid Chambers: Fluid chambers are located on either side of the diaphragms.
- Exhaust Port: As compressed air pushes one diaphragm, the air on the opposite side is expelled through the exhaust port. This port vents the air used to move the diaphragms, and in some applications, exhaust air is collected or muffled to reduce noise.
- Center Section: This is the core of the pump, housing the air valve and the air distribution system.
How These Parts Work Together
When the pump starts, compressed air is directed into the air chamber behind one of the diaphragms, causing it to push outward and transfer fluid out through the outlet manifold. Simultaneously, the opposite diaphragm is pulled inward, creating suction in its fluid chamber, drawing in new fluid through the inlet manifold. The air valve then alternates the air supply to the other diaphragm, repeating the process. This alternating motion allows AODD pumps to handle viscous, abrasive, and shear-sensitive materials efficiently and reliably.
This design makes AODD pumps ideal for industries where the safe handling of various fluid types—especially in explosive or corrosive environments—is essential.
Advantages of an AODD Pump
1. Corrosion Resistance
Advantage: Built with materials like PTFE, Viton, and Santoprene, AODD pumps can handle a wide variety of fluids, including those that are abrasive, viscous, corrosive, or contain solids.
Benefit: This versatility allows them to be used in many different industries and applications, from chemical processing to food and beverage production.
2. Self-Priming Capability
Advantage: AODD pumps are self-priming, meaning they can start pumping without needing to be filled with fluid first.
Benefit: This makes them ideal for applications where the fluid source is below the pump or where frequent starts and stops are required.
3. Ability to Run Dry
Advantage: AODD pumps can run dry without damage, unlike many other pump types. This means operating the pump without fluid moving through it.
Benefit: This is valuable in situations where the fluid supply may be inconsistent or may be interrupted. For example, you could use an AODD to pump out the contents of a barrel without needing to monitor the liquid level and shut off the pump immediately when the barrel is emptied to avoid damage to the pump.
It should be noted that although an AODD pump can run dry, prolonged operation with no fluid can be hard on the diaphragms and other components.
4. Safety
Advantage: While not all AODD pumps are inherently explosion-proof, they are powered by compressed air and don’t require electricity, eliminating the risk of sparks.
Benefit: This generally makes them safe for use in hazardous environments where flammable or explosive materials are present, such as in the oil and gas industry. Always be sure to check that your pump and pump materials are compatible and designed for your application and environment.
5. Gentle Pumping Action
Advantage: The reciprocating diaphragm movement in AODD pumps produces a gentle, low-shear pumping action compared to other pump types.
Benefit: This makes AODD pumps preferable for handling shear-sensitive fluids, such as emulsions, suspensions, and biological materials, without damaging them.
6. Easy Maintenance
Advantage: AODD pumps have relatively simple designs with few moving parts, making them easy to maintain and repair.
Benefit: Maintenance can typically be performed on-site without the need for specialized tools, reducing downtime.
7. Pumping of Solids and Slurries
Advantage: AODD pumps can easily handle fluids containing solids or slurries without clogging.
Benefit: This capability is crucial in industries like wastewater treatment, mining, and construction, where the fluid being pumped often contains particles or debris.
8. Simple Control
Advantage: The flow rate of AODD pumps can be easily adjusted by regulating the inlet air pressure without the need for complex controls.
Benefit: Common air regulators are all that is required to adjust the pump. A simple ball valve can be used to turn the pump on and off.
9. Suction Lift Capability
Advantage: AODD pumps can achieve significant suction lift (30 feet or more!), making them capable of drawing fluid from deep or difficult-to-access locations.
Benefit: This makes them useful in situations where the fluid source is located below the pump, such as in sump pits or underground storage tanks.
Specific AODD Pump Applications Across Industries
The unique design of AODD pumps allows them to fit into several different applications. Let’s examine some specific scenarios where an AODD pump can excel while other transfer pumps fall short.
Safe Transfer of Corrosive and Hazardous Fluids
In the chemical industry, AODD pumps are essential for safely transferring corrosive and hazardous substances. Their seal-less design significantly reduces the risk of leaks, enabling secure handling of acids, solvents, and aggressive chemicals.
Specific applications: AODD pumps with poly body and Teflon diaphragms can be used to pump high concentrations of phosphoric acid and Kynar body pumps with Teflon diaphragms can handle sulfuric acid.
AODD Pumps in Food and Beverage Production
AODD pumps are widely utilized in the food and beverage sector to handle products like sauces, syrups, and beverages. Their mild pumping action preserves the quality and consistency of materials that can change in viscosity when agitated or stirred (creams, sauces, condiments, etc.).
Specific applications: There are also AODD pumps designed for handling large solids and slurries associated with the meat and poultry processing industries. These pumps are sanitary pumps designed for quick and easy cleaning. Typically featuring high-grade stainless-steel bodies.
Mining and Construction: Heavy-Duty AODD Pumps for Slurry and Dewatering
Mining and construction industries present unique and rugged applications. The need for dewatering dirty water and sludge where the contents and solids sizes are often varied and unpredictable. The right AODD pump can withstand tough environments. They are also portable and can run dry without damage, making them a reliable choice in these demanding fields.
Specific Application: Warren Rupp offers durable pumps with metal bodies (aluminum, cast iron, stainless). The Sandpiper Beast is a tough, clog-resistant pump designed to move fluids with debris up to 2 inches in diameter.
Petroleum Industry
In the oil and gas industry, AODD pumps move crude oil, gasoline, diesel, and other petroleum fluids. The pumps’ lack of electrical components provides explosion-proof safety, making them ideal for hazardous environments.
AODDs are ideal for handling oils and hydraulic fluids of various weights making them a versatile option for fleet maintenance.
Specific Applications: The Zeeline NS1040UL is a UL-rated AODD that will safely pump gasoline and diesel fuels up to 37 gallons per minute.
AODD pumps also work excellent for handling waste oil.
Car and Fleet Wash
Transferring different soaps, detergents, wax, and sealers requires a pump that can move the fluid without resulting in foaming. It also must handle a wide range of different chemical combinations and viscosities.
Specific applications: This Yamada poly pump is versatile and has wide chemical compatibility for soaps, detergents, and other cleaning products.
What Materials are AODD Pumps Made From?
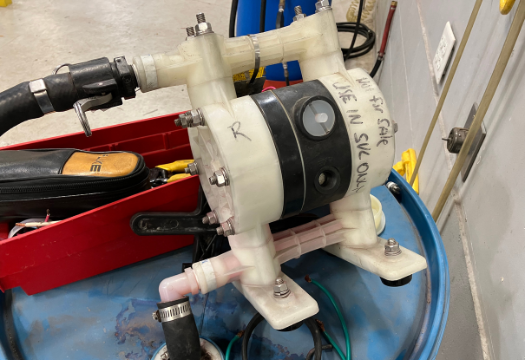
AODD pumps are constructed from a variety of different materials. Different materials are used for the main components: the housing, check valve balls, seats, and diaphragms.
The housing (or body) of an AODD pump consists of the fluid chambers and inlet/outlet manifolds. Common materials include:
- Aluminum: Lightweight and suitable for oils, coolants, and certain solvents but may corrode with acidic or abrasive fluids.
- Stainless Steel: Durable and resistant to corrosion, making it ideal for food, beverage, pharmaceutical, and certain chemical applications.
- Polypropylene: A cost-effective, lightweight plastic that resists a wide range of chemicals.
- Kynar (PVDF): A chemically resistant plastic with excellent durability, often chosen for aggressive chemicals like acids and solvents.
- Cast Iron: Highly durable but susceptible to corrosion with certain chemicals. They are commonly used for demanding applications in construction and mining.
The check valve balls are in direct contact with the fluid and must be resistant to the medium you are pumping. Common materials include:
- Santoprene: A thermoplastic elastomer with good chemical resistance, typically used for water-based fluids and certain chemicals.
- PTFE (Teflon): Highly resistant to chemicals, suitable for aggressive solvents, acids, and high-temperature applications.
- Nitrile (Buna-N): Good for petroleum and certain chemicals but less resistant to extreme temperatures.
- Viton: Excellent for high-temperature and a variety of chemical applications.
Seats create the sealing surface for the balls, and their material affects the pump’s fluid compatibility. Common seat materials:
- Polypropylene
- Stainless Steel
- Santoprene and Buna-N
Diaphragms are crucial in AODD pumps, as they directly handle fluid and pressure. The choice of diaphragm material influences chemical resistance, flexibility, and temperature tolerance.
- Santoprene: A flexible, durable option for a range of chemicals, commonly used in general applications.
- PTFE (Teflon): Excellent chemical resistance, suitable for aggressive fluids, and has a longer lifespan in abrasive applications.
- Buna-N (Nitrile): Good for petroleum-based fluids and general applications but limited by lower chemical and temperature resistance.
- Hytrel: A thermoplastic polyester with good chemical resistance, flexibility, and durability for various industrial fluids.
AODD Pump Limitations
The AODD family is very versatile and offers unique benefits but there are some limitations:
Requires Continuous Air Supply
AODD pumps need a reliable, continuous supply of compressed air to function. In remote locations or applications where compressed air is not readily available, additional equipment (like air compressors) may be needed, adding to setup costs.
Efficiency and Air Consumption
AODD pumps rely on compressed air to operate, which can lead to high air consumption, especially when running at high flow rates or under heavy loads. This can increase operating costs.
Compared to other types of pumps (like centrifugal pumps), AODD pumps typically have lower energy efficiency. This can be a drawback in applications where energy efficiency is a primary concern.
If energy efficiency is a priority, Graco offers electric motor-driven double diaphragm pumps. This provides you with the benefits of an AODD with significantly lower (up to 80%) operating costs.
Pulsing
The “back and forth” nature of the pumping operation can result in a pulsating flow. This can be mitigated with pulsation dampeners, but it may still not be ideal for applications requiring a steady, continuous flow.
Pressure
An Air-Operated Double Diaphragm (AODD) pump typically operates at a maximum pressure of around 100 psi, although certain specialty models can handle higher pressures. These pumps are generally not suitable for high-pressure applications that exceed their design limits. Most AODD pumps have a 1:1 pressure ratio, meaning the liquid discharge pressure matches the air inlet pressure. For example, if the air supply is set to 50 psi, the pump will produce a liquid discharge pressure of approximately 50 psi.
Ready to Choose the Right AODD Pump?
Explore our selection of Air-Operated Double Diaphragm (AODD) Pumps, tailored for a wide range of applications. Our team is ready to assist you in finding the perfect pump for your industry’s needs.

Tech Ag & Industrial Sales
Shane Blomendahl is a tech sales veteran at Dultmeier Sales with over 10+ years of experience in liquid handling products covering several industries and applications.


