Search
Call for Live Order Assistance & Technical Support (7:30am-5pm CST)
All Categories
    Menu Close
    RSS

    Blog

    (0) Disinfectant Basics - 3 Methods for More Effective Disinfecting

    20 Gallon Spill Kit

    We speak a lot about sanitation and disinfection these days. From the office and classroom to our own personal spaces, we are focused on cleaner, safer areas more than ever. And while many businesses are just now taking a closer look at how they clean their facilities, disinfecting in food processing has long been serious business. That doesn't mean all disinfectants for food processing cleaning are made equal.

    Disinfectants come in a variety of forms, each with its distinct advantages and disadvantages. In fact, which disinfectant you choose for your application is just as important as the why and how you disinfect. As we'll cover in this article, understanding the basics of each disinfectant type and the general rules behind applying them ensures a more comprehensive and cost-effective cleaning regimen. Read on for our breakdown of disinfection basics for more effective disinfecting.

    Why Disinfecting in Food Processing is So Important

    While commercial processing facilities spend the majority of their time up and running, their most important activity occurs when the production floor is empty and silent. Maintaining clean, sanitary workstations and equipment, particularly in food processing, is integral to public health and safety. In the United States, such standards are overseen by government agencies such as the EPA, CDC, and USDA.

    But why disinfect at all?

    E. coli, a common bacterial target of disinfecting food processing facilities

    E. coli, a common bacterial target of disinfecting food processing facilities


    Well, for starters, food processing plants are not the cleanest places once production gets going. Soils, in the form of fats, oils, blood, and other animal protein and production byproducts, quickly collect on equipment and surrounding surfaces. Such deposits, if left unaddressed, make these surface areas ideal breeding grounds for countless hosts of bacteria, viruses, and other potentially harmful microorganisms.

    Proper cleaning removes these unwanted soils and contaminants, providing significant benefits downstream. Maximized production efficiency, increased product shelf life, safer work conditions, and fewer mechanical failures and delays are but a few positive outcomes to attentive housekeeping. Scheduled cleaning and disinfection also significantly decrease the chances of costly product recalls due to food hazard risks such as food poisoning or foreign body contamination.

    A processing plant's commitment to a culture of health and food safety can easily be seen by how devoutly they approach the cleaning and disinfecting processes. And yes, there is a difference between the two.

    Cleaning vs. Disinfecting

    For most of us, cleaning, sanitizing, and disinfecting are all one and the same concept. They are, however, three distinct steps within the larger cleaning process. Cleaning is the process of physically removing unwanted substances and contaminants from a given surface. The cleaning stage, sometimes referred to as the detergent stage, is often characterized by the removal of common soils such as dirt, grease, or oils via manual scrubbing with brushes or wipes or washing with a high-pressure spray wand. Cleaning a surface in this manner alone; however, will not kill germs present.
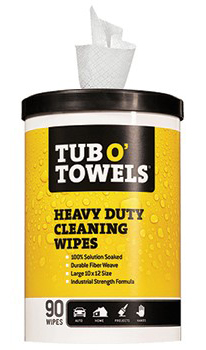
    Tub-O-Towels - Heavy Duty Cleaning Wipes for removing difficult soils

    Heavy Duty Cleaning Wipes for removing difficult soils


    Disinfecting on the other hand, does kill bacteria and other microorganisms left behind following the cleaning stage. While similar to sanitizing agents, which merely reduce the number of bacteria and other germs to acceptable levels of health safety, surface disinfectants make a surface truly contaminant-free. Their high bactericide concentrations of chlorine or bleach eliminates the ideal growing conditions bacteria and other microorganisms thrive on.
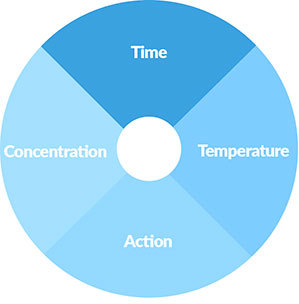
    TACT Disinfection Cycle


    Every cleaning application will follow a distinct set of variables, generally known as TACT. The four aspects of this cleaning/disinfection concept are time, temperature, action, and concentration. How prominently each phase is in the disinfecting cycle depends specifically upon your unique needs, including the soils you're wanting to destroy, and the chemicals being used. Followed properly, the combination of them all will achieve the desired result of a clean, disinfected space.

    It's important to understand that cleaning must take place before the disinfecting stage. Since disinfectants do not break through heavy soils on surfaces, removing such deposits ahead of time ensures the disinfectants are able to work with the greatest efficacy.

    Choosing the Right Disinfectant for the Environment & Application

    Today, disinfectants cover a wide spectrum of chemical concentrations and applications. Choosing the right disinfectant for a specific environment, therefore, can be a task in and of itself. A few things to consider.

    First, the choice of disinfectants depends foremost on a user's requirements. In other words, where are they disinfecting and what type of contaminants are they trying to eliminate. After that, the type of processing and cleaning equipment used, the application method, and, to some degree, the personal preference of the user all play a role in selecting a disinfectant.

    Also, review a disinfectant's toxicity, leftover residues, and any possible chemical reactions related to water hardness and various surface types. This is particularly important within the food processing industry. Any residual chemical compounds left behind after disinfecting can adversely affect product taste, curing, and shelf life. In the brewing industry, for example, certain disinfectant cleaners are avoided because they linger on glass surfaces. (Soapy beer anyone?) Understanding a disinfectant's proper application process and any residue properties it has helps prevent product quality from suffering.

    Once a disinfectant is chosen, the most important thing to remember is to always read your disinfectant product labels! Always. With effective cleaning practices, disinfectants will kill 100% of germs listed by the label-when used properly.
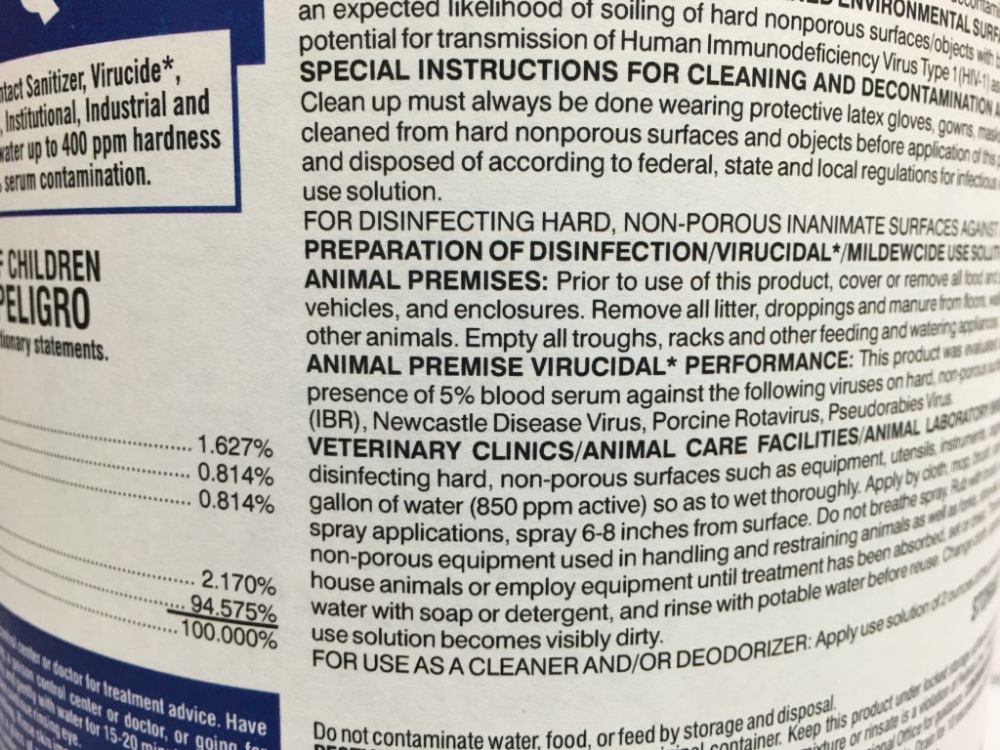
    Disinfectant Label


    Ignoring what's detailed on the label-or choosing not to read it altogether-is a great way to undermine a disinfectant's effectiveness and cause mechanical failure of your disinfecting systems. It's also quite dangerous. Later in this article, we'll cover some of the safety considerations and equipment needed when dealing with disinfectants. For now, just remember that the label is the law. By following the label, you keep you, your cleaning staff, and anyone who comes in contact with the disinfected area, directly or indirectly, safe.

    Disinfectant Type Comparison: Foam, Spray & Steam

    Most of the food processing industry today relies on three common disinfectant application types: foam, spray (aerosol), and steam. Since no two environments are exactly alike, no two disinfectants will perform equally across the board either. Below we've provided some comparisons for these three disinfectant types and some general considerations to have before choosing the right disinfectant for your situation.

    Foam Disinfectants
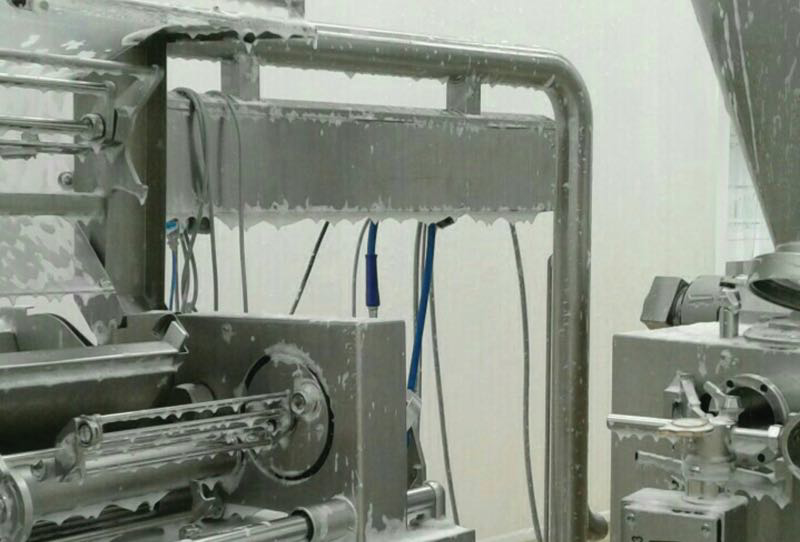
    Foam Disinfectants


    Pros:

    • Better coverage of surfaces
    • Greater visibility of coverage
    • Lower pressure application
    • Less product needed to work
    • More cost-effective than other disinfectants

    Cons:

    • More challenging mix ratios
    • Added costs if needing separate surfactant agent
    • Greater attention to spray nozzle orifice size
    • Greater flow needed to apply

    Foam disinfectants are quite common in most food processing and industrial operations. Why? For starters, foam disinfectants can offer up to 50% more coverage than sprays. This is because foam expands as it comes in contact with a surface, greatly increasing coverage and disinfecting performance. In large production spaces, such as production floors or livestock barns, this helps keep cleaning costs down. Users can realize up to 50% cost savings on chemical alone, with additional savings possible in application time as well. Foaming is also a great option for disinfecting ceilings and vertical surfaces since the foam adheres better than sprays and therefore extends disinfection dwell time.

    One challenge with foam disinfectants, however, is the need to include a surfactant. A surfactant is a foaming agent that chemically reacts with your disinfectant chemicals. Surfactants also lower the surface tension between two materials, such as water and dirt, making the soil easier to remove. Without a surfactant, your disinfecting solution will not foam properly, making it less effective. While some disinfectants include a surfactant already, most do not. Be sure to read your labels prior to starting your cleaning process to ensure proper solution effectiveness.

    Additionally, check that your application equipment is compatible with foam solutions. Using a high-pressure pump without the appropriate chemically compatible elastomers is a great way to ruin an expensive pump. It is imperative, therefore, to check the chemical compatibility of ALL components throughout your entire cleaning systems. That includes examining the largest pump to the tiniest o-ring. In doing so, you not only avoid costly equipment damages or failures, but also prevent ineffective treatment from taking place.
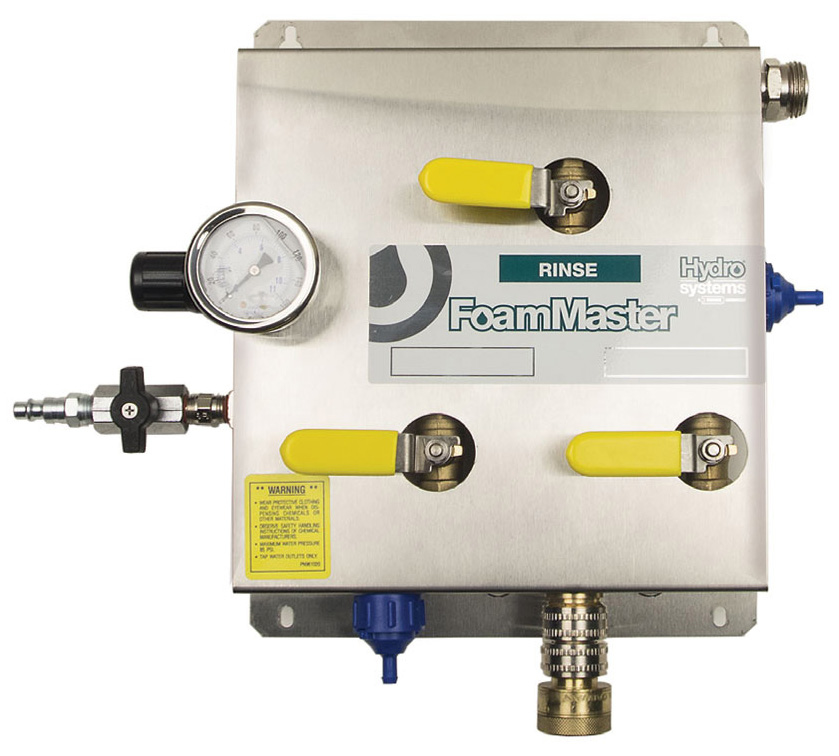
    Hydro Systems FoamMaster


    Opt for chemical spray foamers and accessories that feature downstream injectors that bypass incompatible seals and components. Better still, invest in a complete foaming system like the Hydro FoamMaster. Available in multiple mounting styles, the FoamMaster is ideal for larger industrial cleaning applications, from washdown facilities and meatpacking plants to animal production buildings, such as the dairy barns shown in the video above. These compressed air units allow a user to set the desired dilution rate for their specific application. From there, the system mixes the chemical and surfactant with the carrier agent (generally water) to create rich, clinging foam.

    Dultmeier has even helped develop custom disinfecting systems. Check out our work on the JBI Poultry Disinfectant Foaming Trailer here.

    Spray Disinfectants
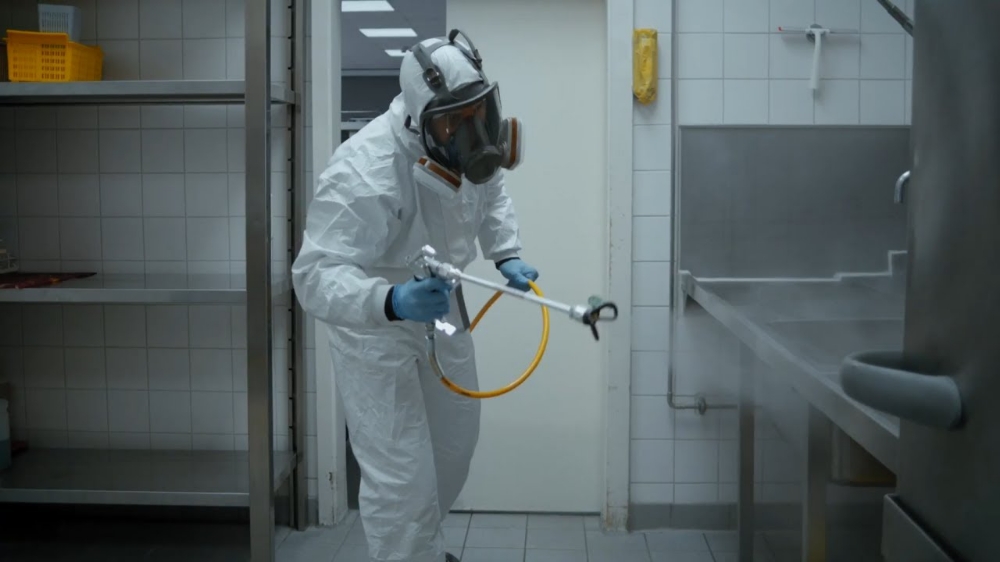
    User disinfecting with spray in an industrial kitchen

    User disinfecting with spray in an industrial kitchen


    Pros:

    • Fewer chemical compatibility issues
    • Quick-and-easy to apply
    • Wide variety of disinfectant types
    • Usable for almost any application/environment

    Cons:

    • More chemical usage to achieve adequate coverage
    • Generally higher pressures applications
    • Greater health concerns due to aerosol emissions
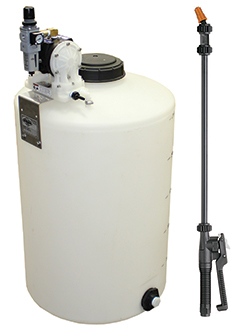
    Dultmeier Sales DC1 Air-Driven Disinfectant Applicator

    Dultmeier's DC1 Air-Driven Disinfectant Applicator


    Aerosols are the most widely used disinfectants used for industrial cleaning tanks to their incredible versatility and ease-of-application. You can find disinfectant sprays for nearly every circumstance and apply them using a commercial pressure washer, handheld or backpack sprayer, or similar system without any chemical compatibility issues. Dultmeier's DC1 disinfectant applicator system, for instance, features an air-powered diaphragm pump, a 25 gallon storage tank with an automatic mixing valve, and a trigger spray wand that can easily store and apply most disinfectant products without a problem.
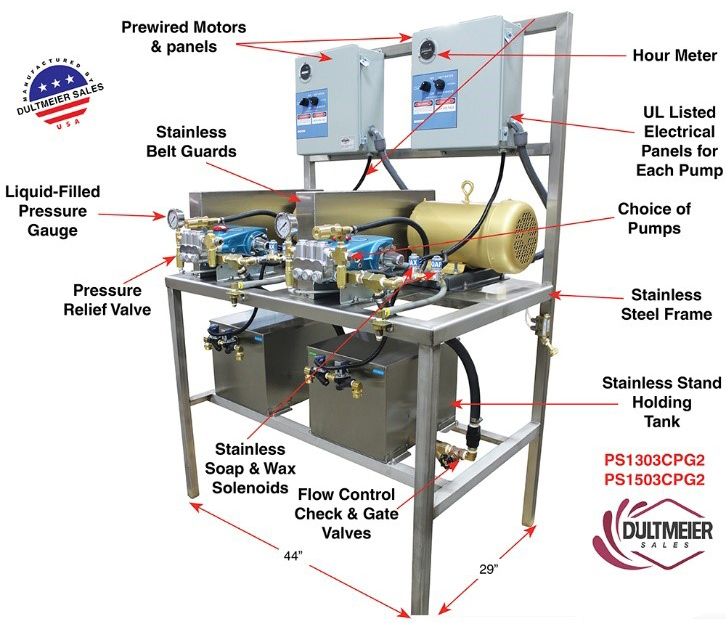
    Complete Plant Washdown/Industrial Clean System

    Complete Plant Washdown/Industrial Clean System


    The thing about spray disinfectants is that they can be costly. For one, most disinfectant sprays require a high-pressure system to be applied well. These systems; while effective, can be expensive to fund. Furthermore, since so much energy goes into turning a disinfecting solution into spray, an operator may have to use more product to disinfect an area compared to if he used foam.

    Steam Disinfectants
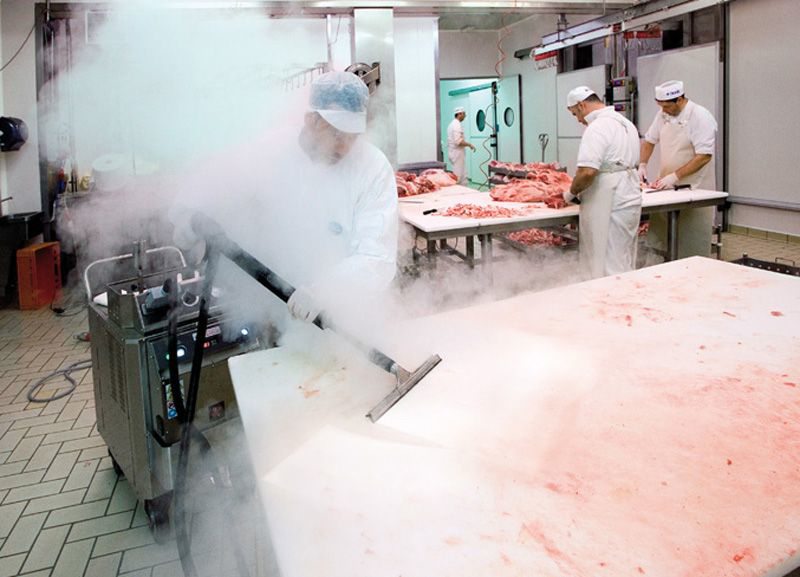
    Dry steam disinfecting for food processing sanitation

    Dry steam disinfecting for food processing sanitation


    Pros:

    • Effective against a wide range of microorganisms
    • Not affected by soils or hard water
    • Non-corrosive or chemically reactive
    • Leaves behind zero residue

    Cons:

    • Cannot be used on heat-sensitive equipment or surfaces
    • Does not remove large soil deposits
    • Dangerous high temperatures to human contact
    • Difficult to maintain consistent temperature and exposure

    As their name suggests, steam disinfectants work using steam to kill bacteria, spores, and other contaminants. The prolonged exposure to the moist high heat destroys microorganisms, leaving surfaces truly decontaminated.

    Although a viable disinfectant method, we recommend using either foam or spray detergents for most applications. The main drawback to steam is that high temperatures, generally either 250° F or 270° F (or greater), must be maintained throughout the disinfection process to ensure microbial death. Such high temperatures can also damage certain components and surfaces. Foams and sprays have much wider applications, which simply makes them better and more-cost effective options for most operations.

    Disinfecting Scope - Know Before You Go

    No two areas are created equal when it comes to cleaning and disinfecting. Case in point, you don't clean and disinfect an office space in the same way you do a meat packing processing floor. That makes understanding your scope of disinfection all the more important before ever beginning the cleaning process.

    Product Needs
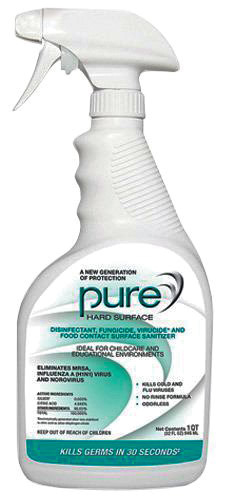
    Pure hard surface disinfectant

    Purehard surface disinfectant; ideal for food processing & food preparation


    For instance, the size of the area you're disinfecting will greatly influence the amount of product needed. Do you need a 5-gallon bucket of disinfectant or a 55-gallon drum? Maybe you need more. This is where foam disinfectants really have the advantage. Their enhanced coverage and prolonged contact time with the applied surface allow less product usage.

    Make note of the GPM flow of your system. If you have a pump that produces 3 GPM of flow attached to a 50 gallon tank, you effectively have 16.5 minutes of continuous application time. Time is money, so how much time will be spent mixing solution is an extremely important thing to remember when disinfecting large areas.

    Disinfectant Systems

    Your style of disinfectant system is something else to keep in mind. Most operations have some level of clean-in-place (CIP) process. However; for a vast majority of the disinfecting process, mobile cleaning units are necessary to leave an area truly decontaminated. Portable disinfectant systems equipped with powerful pumps and spray wands allow an operator to spray disinfectant at a variety of angles, speeds, and tailored quantities. This versatility ensures every hard-to-clean space can be adequately decontaminated.
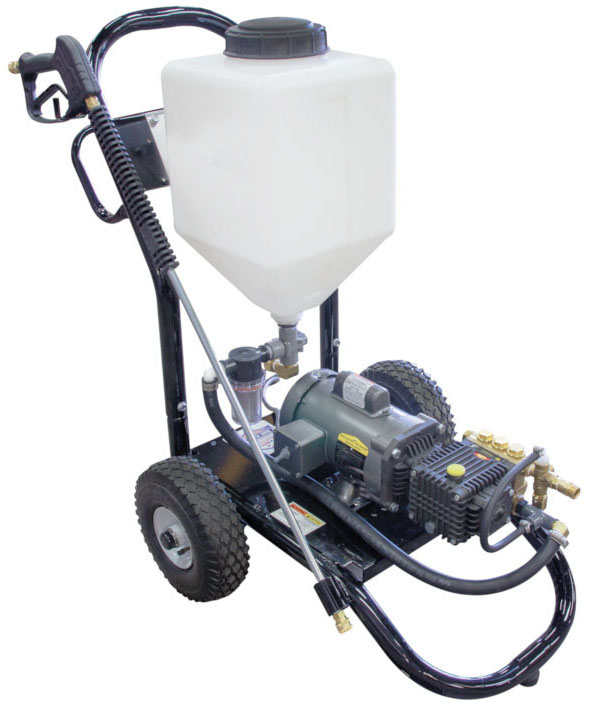
    Portable Sani-Mister disinfectant unit

    Portable Sani-Mister disinfectant unit


    Ventilation

    Finally, take a minute to evaluate your space's ventilation. Taking the office vs. processing floor scenario, ventilation is likely very different between the two spaces. On the processing floor, the larger area means aerosols and vapors have more room to dissipate or be dispersed by exhaust fans. In the smaller office space, however, chemical fumes become more of a hazard. Respirator masks may be required based upon the chemicals used and/or size and ventilation capabilities of the application area.

    Always be cognizant of how to enter a space for disinfection and understand how your solutions react when in use. Evaluating how to approach an enclosed space for disinfecting and how long someone should be exposed to that environment once they start keeps everyone healthy and safe.

    Safety First: Personal Protective Equipment (PPE) for Disinfecting

    Personal Protective Equipment PPE for Disinfecting


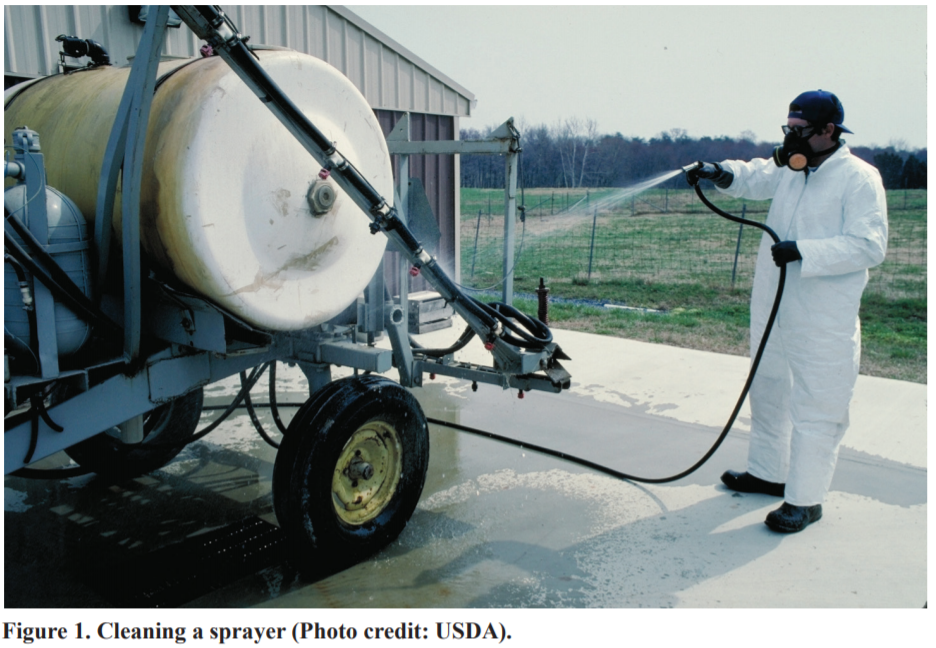
    Regardless of the style of disinfecting you ultimately use, you need to wear personal protective equipment, also known as PPE. This protective equipment ranges from nitrile chemical gloves and safety goggles to full body TYVEK coveralls. These products protect you from spills, splashes, and unexpected contact with the disinfectants which can cause serious chemical burns.

    Reusable Unlined Gloves


    Certain aerosol disinfectants may even require a respirator mask to protect you from harmful chemical vapors. Even if the disinfectant label doesn't list a respirator as required PPE, you may still choose to wear one if working in a small, poorly ventilated space. Each chemical application is different.

    Read your product labels for the proper PPE required to handle specific disinfectants safely. Regularly inspect PPE for wear or damages and replace if needed. Also, ensure your facility has clearly marked eyewash stations and safety showers in case of an emergency. Whether you need gloves, eye protection, or water-resistant clothing, we can help you find the gear you need to be best equipped for the tasks at hand.

    Conclusion

    Proper cleaning and disinfecting procedures will always be a serious focus in the industrial and food processing industries. In fact, one of the most important activities that occurs in any industrial processing facility is their disinfectant regimen. Even so, disinfection practices and policies will continue to change with new health research, product development, and societal perceptions. With that in mind, having a reliable, knowledgeable company you can trust to support you is imperative to your business's success.

    Dultmeier is that company you can trust. We carry an extensive catalog of disinfectants, personal protective gear, and cleaning equipment and supplies from trusted brands like Mosmatic, DEMA, Suttner, General Pump, Hydro Systems, Boss, and others. While we cannot ultimately tell you how to disinfect, we can share with you the many different methods and assist your operation regardless of your choice of application. We'll happily help answer all your questions about various disinfecting types and work to get you the equipment and products you need to ensure your workspaces are cleaner than ever.

    Reach us at dultmeier.com or give us a call at 888-667-5054. Your Experts in Delivering Fluid Handling Solutions - WE KNOW FLOW!

    (0) Sizing a Pressure Tank - Your Step-by-Step Guide

    Pressure tanks are used in a variety of applications, but a common usage is system efficiency.  For example, one reason someone might install a pressure tank in a plumbing system would be to keep the pump from constantly running.  In doing so, the pressure-regulating tank increases the longevity of the pump/motor and reduces maintenance and down time - ultimately resulting in lower operating costs.  Let's dive into a step-by-step how to of sizing a pressure tank.  


    Info You NEED to KNOW Before Starting

    Before beginning the process of sizing a tank, there are a few important important input data points to know in order to properly size a pressure tank:

    1. Flow Rate
    2. Cut-in/Cut-out Pressure
    3. Target Run Time

    A general rule of thumb, that most manufacturers suggest, is a run time of less than one minute if the horsepower is less than 1HP.  If the motor is over 1HP, then a good guideline to follow, is a run-time of 2 minutes or more.  Always confirm this, with your tank manufacturer of choice, as guidelines can vary.


    General Rule of Thumb for Sizing a Pressure Tank

    Generally, as a rule of thumb, one can follow these guidelines when sizing a pressure tank:

    1. 0-10 GPM: 1 gallon of drawdown per 1 GPM of flow
    2. 10-20 GPM: 1.5 gallons of drawdown per 1 GPM of flow
    3. 20 GPM+: 2 gallons of drawdown per 1 GPM of flow

    Drawdown can be defined as the amount of volume loss in the tank as the plumbing system "draws" off this pent up pressure. After all, the purpose of a pressure tank is to maintain pressure in a given system and give the pump a break. This way, the pump doesn't need to run constantly to remain at system pressure. While a pressure tank can appear costly up front, it will save in the long run. Less run time for the pump means less maintenance and less money in energy costs. 

    There are various orientations of pressure tanks and the most common are horizontal, inline, and vertical.  Be sure to determine which orientation works best for your plumbing setup.  

    Once we have identified our flow rate in gallons per minute (GPM), have identified our cut-in/cut-out pressure, and confirmed our target run time - we must determine what cut-in/cut-out pressure we want to set the system at.  


    Pressure Tank Sizing Explained

    An important equation to remember when sizing a pressure tank is below:


    Flow Rate X Run Time = Tank Draw Down Capacity


    Example: 

    Let's say we have a pump that produces 5 GPM and is ran by a Âľ HP motor.  Since I'm operating a motor that is less than 1 HP, we are going to assume that "ABC Manufacturer" recommends a 1-minute runtime.  We want to design this system to cut-in (turn on) at 40psi and cut-out (turn off) at 60psi.  

    5 (Flowrate) X 1 (Runtime) = 5 gallons of Draw Down (at 40/60PSI)

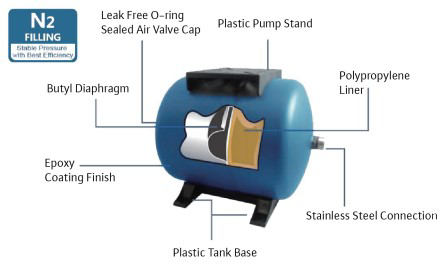
    So, I will need to select a tank that allows for 5 gallons of draw down at a pressure setting of 40PSI cut-in and 60PSI cut-out.  If I need a vertical tank, I could select a WOMAX-220.  If my plumbing layout would accommodate a horizontal tank better, I could select a WOMAXH-220.  This would give me approximately 3.5 minutes of run time before the pump would cycle back on. Horizontal pressure tanks have a plastic pump stand so you can maximize space when designing a plumbing system. This is certainly a nice feature when working in confined spaces where space is at a premium. 


    Relationship Between Pressure & Tank Size

    An important thing to remember, the higher the operating pressure - the larger the tank must be. Pressure and tank size have a direct correlation - as one increases, so does the other.  The higher the pressure setting, the less the drawdown is and thus, the need for larger tank capacity.  


    Wilo Pumps Logo


    After we have these three points determined, we can then proceed with sizing a pressure tank.  Pressure settings are another important factor with any plumbing system.  The most common pressure settings are 30/50; 40/60; 50/70.  Most manufacturers will have a pressure tank sizing chart that will allow viewers to quickly size a tank's drawdown based upon their system's pressure settings. 

    We can supply you with this information on the Wilo MaxAir® product line if you want to get into the details. Just give us a ring or visit www.dultmeier.com 24/7. Here is a drawing of a Wilo MaxAir® horizontal tank that outlines some features which set this product line apart from the rest of the pack and really make it one of the top line products in the marketplace. 


    Cutaway of Wilo MaxAir Horizontal Pressure Tank

    Cutaway of Wilo MaxAir Horizontal Pressure Tank


    You can view the full offering of Wilo MaxAir® Pressure Tanks Right Here on dultmeier.com. As always, should you have further questions about pressure tank sizing or other applications - don't hesitate to contact us.  That's what we are here for.  Your Experts in Delivering Fluid Handling Solutions - We Know Flow!
    (0) Inventory Levels Matter at Dultmeier Sales - Proof In the Pudding

    JIT vs. Quarterly Inventory Strategies

    Inventory management and the best strategy to successfully achieve maximum efficiency. It's the long-standing question of any distribution or supply channel.  What is the best methodology to follow when managing inventory?  Just-in-Time (JIT) relies heavily on the concept of inventory turns.  The more inventory turns, the less carrying cost a supplier must maintain.  Lower carrying costs result in a lower market resale price.  

    JIT is one method by which suppliers can help control their costs.  Why order a year's worth of inventory when you can rely on the supply chain to help "offload" some of those costs on your partners?  Furthermore, a JIT strategy allows the business to ebb and flow with demand fluctuations within their respective market(s). 

    In certain instances, a JIT strategy does hold merit.  However, at Dultmeier Sales we have a contrarian approach to this type of strategy.  While we have certain products lines where a JIT strategy does work, there are other lines where we cannot afford to not have the products on the shelf - and ready to ship promptly.

    Our business is an extremely cyclical one.  Roughly 50% of our revenue comes in about a three-month period.  Due to the nature of our business, we must have inventory on-hand.  Therefore, we load up heavy in the fall and winter in preparation for the spring season.  In doing so, we allow our customers to use a JIT approach to run their businesses.  This helps our customers lower their carrying costs & provide them with fast deliveries.  Furthermore, when critical equipment failure occurs - we have the products on the shelf to get them back to operational status - as soon as possible.  

    What We Do For You

    We pride ourselves on being a business partner of this nature.  Inventory levels are something we constantly focus upon and look for ways in which we can continually provide better service levels with higher order fill rates and faster, more accurate shipping.  

    What We Can Do For You

    Because let's face it, when you're down and out - you need the part or piece of equipment fast.  By maintaining considerably larger inventory levels than the competition, we can effectively promise a 95%+ fill rate on stock orders.

    That means if you order 20 items - we have 19 in stock ready to ship promptly.  And most of the time it's consolidated from one origination point - meaning we help lower and control freight costs for our customers - by reducing multiple shipment orders.  Consequently, one shipment means one freight bill. 

    Who We Are

    In addition to healthy inventory levels, we pride ourselves on warehouse accuracy.  In all honesty, if we have the item on the shelf, but cannot get it to the customer for whatever reason - we didn't live up to our promise of impeccable service.  Therefore, it has been and will continue to be our long-standing goal to exceed and maintain 99.8% shipping accuracy.  This means we accurately ship the item(s), and quantities, written on the sales order over 99/100 times.  

    You need it - We have it. That was fast.  Pretty simple concept.  But, to produce extreme simplicity, one must solve the extremely complex.  Therefore, we continue to invest in ourselves and our operating systems.  We continually invest in our people and technology to ensure that we constantly improve and strive for the ever elusive 100% success rate for our customers.

    Additional Value Added Services

    We back our inventory strategy up with some of the best technical expertise in the industries we serve.  With over 250 years of combined technical experience, we have most likely run across your application question.  Furthermore, if we don't know, we will help to provide a solution that improves the efficiency of your operation - all the while, doing our best to help lower your operating costs. We invest in our people, technology, and inventory to make your business more profitable and efficient.

    We also want to highlight the fact that we have a Free Freight Program that runs throughout the year. This can further help reduce costs for our customers to help them maintain a higher level of profitability. You can check out our Free Freight Program right here

    Careers

    (0) Pulley & Sheave Sizing - All Types of Pump Motors

    We commonly receive the call to help assist in properly sizing pulleys and sheaves for pump applications.  Generally, this is in high pressure wash applications but we also run into a fair amount of agricultural applications where this knowledge can be leveraged.  Pulleys or "sheaves" are commonly used for connecting pumps to motors or engines via drive belts.  Most pulleys are cast iron or aluminum construction and are offered in either fixed-bore or tapered bushing styles.

    Why is it Necessary to Size Pulleys for Each Application?

    For proper operation of any brand or pump type, it is critical to size pulleys and sheaves, correctly, in order to maintain correct RPM, (revolutions per minute)RPM speed is what determines the pump output flow rate - in gallons per minute, liters per minute, etc.

    Incorrect pump RPM will adversely affect the pump performance.  If the pump is turning too slow - it will not give full performance.  Conversely, if the pump is turning too fast, it could cause premature mechanical failures (i.e. valve wear or elastomer failure).

    Therefore, it is absolutely critical to ensure correct pulley sizing and analysis of the drive unit, (motor, engine, etc.) relative to the pump. For the sake of this discussion, we will assume standard electric motors at 1750 RPM and standard gas engines at 3400 RPM.  Do note, one must determine the rpm of their drive unit to be able to accurately calculate the pulley/sheave size.

    If you start with an incorrect figure for RPM - you will size your equipment incorrectly.  This could lead to shorter equipment lifespans and/or reduced output flow rates.  Thus, ultimately a less efficient system which equates to more down time and added cost of operation.  The scope of this post will be focused towards plunger pump applications.  We assemble many units using this method in Omaha, Nebraska.  Dultmeier Sales is proud to display the Built in the USA logo on our products.  Here are just a handful of the pulley-driven pump products that we offer.

    The Math of Pulley Sizing

    There are complicated formulas for determining pulley ratios but in generic, layman terms, simply divide the driven component (pump) by RPM, the driver component (motor or engine) rated by RPM to get the required ratio.  In the example below, the pump RPM is 1070, for full output, while the motor is 1750 RPM.

    Therefore, the ratio of the required pulleys would be:


    1070 (pump RPM) divided by 1750 (motor RPM) = .611


    This means the pulley ratio must be .611 to drive the pump correctly.  Hypothetically speaking, if we had a 4 inch pulley on the motor, we would require a 6.55" pulley on the pump.  That mathematical equation is as follows: 4" divided by .611 = 6.55"

    For the same pump, driven by a gas engine


    1070 (pump RPM) divided by 3400 (engine RPM) = .315 


    If the drive pulley on the engine is 4 inches in diameter, we need to calculate 4/.315 = 12.70.  This means that the pump pulley must be 12.70 inches, in diameter, to run the pump at 1070 rpm.  You can view a technical page from our catalog here - it will help to further explain the calculation process.

    Tapered Bushing vs. Fixed Shaft Bores

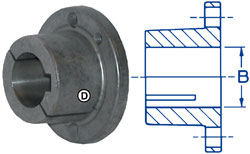
    Most pulleys, or sheaves, are designed with either fixed shaft bores or tapered bushing hubs.  Replaceable hubs fit the required motor or pump shaft size in either inch or mm sizes - depending on the application requirement.  These hubs come with bolts to attach them to the pulley, or sheave.


    Tapered Bushing


    Tapered style hubs simply fit into the pulley opening and then are tightened with two or three set screws, which draw the bushing and pulley together to make one assembly.  The pulleys are then attached to the driver (electric motor or gas engine) and driven components (pump).  The type of hub, H, SD, SH, etc. must match to a pulley with the same designation for proper fit.

    Therefore, make sure to identify what type of hub you have PRIOR to ordering.

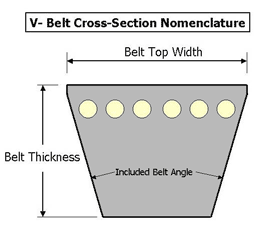
    Pulleys can be measured in a number of ways. Two of the most common methods are belt pitch and outside diameter (O.D.).  When using the, most common A/B, belt pitch method, one must identify both A belt pitch and B belt pitch.  This is the pitch diameter of the V-belt you are using, (A/B) is the measurement of how the belt fits into the groove of the pulley.


    pitch length


    A belts are not as wide as B belts and, therefore, sit lower in the pulley groove.  While this may seem as a minor detail - it absolutely affects the ratio measurement when properly sizing a pulley.

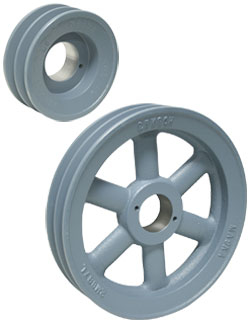
    Pulleys are available with different numbers of grooves. The number of grooves matches the number of belts that the pulley will accept.  A two groove pulley will accept two V-belts.  A single groove pulley will only accept one belt.

    Again as a general rule, (but not intended to use in every application) single groove pulleys with single belts can be used up to about 5 horsepower. Two groove belts can be used from 5-15 horsepower and three groove belts up to 25 horsepower.  Use this as a general guideline but always make sure you consult us if you are unsure of your application needs.


    Two Groove Sheaves

    Two Groove Pulleys


    For correct belt sizing, there are charts available that show the sum of the pulley diameters and the center distance they are apart, from each other.  We will be happy to supply you with one of those charts if you wish to have a copy.

    For instance, the sum of the two pulleys, in the above electric motor example is 4 inches + 6.5 inches = 10.5 inches.  The mathematical equation to figure this out is as follows:


    A - Pump Pulley O.D.    B - Motor Pulley O.D.


    Belt Size = [A*1.57] + [B*1.57] + [2*center distance between pulleys]


    76.5 = [4*1.57] + [6.5*1.57] + [2*30]


    If the pulleys are 30 inches apart, center to center, then the required belt length would be 77 inches.

    As the information above shows, there are many things involved in order to determine the correct pulleys required to drive your pumps correctly.  It is important to remember the larger the difference in pulley sizes, the larger the center distance required to maintain minimum contact with the smaller pulley.  We would be glad to help with any sizing for your specific applications.  Your Experts in Delivering Fluid Handling Solutions - We Know Flow!

    (0) Hydra-Flex - Fluid Innovation

    Hydra-Flex History

    Hydra-Flex was started in 2002 in a small machine shop. The company originated as a 2-man outfit and quickly grew in ranks from there. The core motivation for HydraFlex was driven by the simple belief to "find a better way" to produce innovative and reliable fluid handling products.

    The core values that drive Hydra-Flex are Innovation, Reliability, and Accuracy. These values are clearly visible in the products they develop. Hydra-Flex is proud to boast its reputation as The Most Trusted Name in Chemical Dispensing.

    This Eagan, MN company holds a committed focus to reduction of waste, salvage of resources, reduction in operating costs and the promise to provide exceptional - and measurable results for end users. Located within the innovative Twin Cities community, Hydra-Flex continues to strive for nothing short of exceptional product delivery.

    Hydra-Flex is listed on Inc. 5000 Fastest Growing Private Companies and winner of Best in Class at the 2016 MN Manufacturing Awards.

    Chem-Flex Injectors

    Hydra-Flex holds patents on chemical dispensing and nozzle technologies. Also named one of Minnesota's Top Inventors by Twin Cities Business Magazine, Hydra-Flex continues to be recognized locally, as well as, nationally. The underlying premise of finding a "better way" to apply fluid handling technologies guides their strategy and solutions offerings.

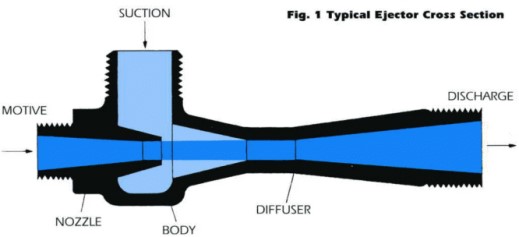
    Taking a common design called a venturi, Hydra-Flex has revolutionized the vehicle washing industry. A venturi is not a new idea - the venturi was actually discovered by an Italian physicist, Giovanni Battista Venturi in 1797. A venturi induces a small portion of another fluid into a carrier fluid. This is created by creating a pressure differential between the inlet and outlet. Constricting the flow of the carrier fluid actually creates a vacuum, thus allowing the secondary fluid to be induced into the carrier agent. Furthermore, mixing the two fluids together through a venturi, ensures proper and equal mixture throughout the solution.

    Hydra-Flex created the Chem-Flex injector to take venturi technology to the next level. Chem-Flex injectors use the most chemical-resistant and longest lasting components available on the market. This includes Kynar venturi inserts, stainless steel connections, a hastelloy spring, teflon check ball and Hydra-Flex's exclusive XFC O-ring. Chem-Flex injectors are built with the goal of finding a "better way" to induce and mix chemicals.


    Benefits of Chem-Flex Injectors


    Benefits of Chem-Flex Injectors:

    Small Footprint - Forget the need for large mixing tanks. Do it inline and mount these systems on the wall - maximize the space in your equipment room.

    Better Vehicle Coverage - Using the same dilution rate but increasing delivery pressure allows for less solution usage and better coverage. Chem-Flex injectors have an application pressure capacity of 65-80 PSI versus traditional chemical dispensing systems that generally run from 25-40 PSI.

    Consistency - Fluctuations in local water pressure do not affect the dilution rate of the injectors. Because the injectors use the pump's regulated pressure you need not worry about this variable. Thus, instilling a greater degree of consistency into your wash system(s).

    Reliability - The simplistic design minimizes moving parts and, therefore, reduces the potential for failure due to mechanical wear. We have already mentioned the added chemical resistance brought on by the internal components used in Chem-Flex injectors - this is an added reliability factor. Rest assured - Chem-Flex injectors will stand up to some of the toughest chemicals on the planet.

    Precision - Color-coded injectors (by flow rate) and metering tips (by dilution ratio) offer precise optimization and easy maintenance of the chemical delivery system.

    Environmentally Friendly - Due to the fact that the solution is applied to the vehicle at higher pressure, less solution is needed to clean the same size surface. This often results in substantial reductions in water and chemical usage. Furthermore, the use of highly concentrated chemicals can help reduce packaging waste and freight costs. If you can order in smaller packages you can help reduce a variable cost in freight expenses.

    The Nozzles

    Hydra-Flex offers five models of nozzles - each one provides a solution to various industry applications. While there are five different models the nozzles can be split into two larger categories - Rotating Turbo Nozzles and Static, Zero-Degree Nozzles.

    Rotating Turbo Nozzles

    Blast-Tec Pro (1000PSI) - designed specifically for high-pressure, high-impact wash applications such as wheel blasters, undercarriage cleaning, rinsing and high pressure cleaning.

    Ripsaw (3200PSI) - specifically designed for hydro-excavation industry. An extremely heavy-duty and high impact nozzle that is ideal for pothole applications. The cone-shaped flow patter provides 18 degrees of coverage.


    Aqua-Rocket (4000PSI) - designed and engineered for the industrial cleaning industry. This nozzle blasts a concentrated 0 degree water jet while rotating at an optimal speed to form a 22 degree cone-shaped spray pattern. Here is a video below


    Static, Zero-Degree Nozzles

    Blast-Force (1000PSI) - This nozzle produces a solid-stream and was specifically designed for spinning, high-pressure vehicle wash applicators. Constructed with corrosion-resistance tungsten carbide nozzle orifices, this critter will get the job done - and then some.


    Switchblade (3200PSI) - Dig Faster. Save Water. Another hydro-excavation nozzle but in a stationary in design. Cut deeper, cut faster. A neat feature of this nozzle is the flexibility it offers. There are individual, replaceable, color-coded nozzle pills that allow the end user to change water flow rates and pattern based upon various soil conditions. Here it is in action:


    Whether you're in the market for nozzles or chemical injectors, you need to consider Hydra-Flex as a viable option in your decision making process. For further questions on other products we offer you can stop by our website any time you wish. Thanks for stopping by and we hope you enjoyed this post.


    (0) Valve Applications & Valve Purchasing Guide

    Dultmeier Sales stocks valves of all different makes, models, and applications. Here you will find all you need to know about the different types of valves we stock and the various applications they are used for. More importantly, we will help you determine what you need to know prior to making a valve purchase. Let's dig in...

    Valve Definition & Common Trade Names

    What is a valve? What are some common trade names, associated with, the valves that Dultmeier Sales stocks and distributes? In a nutshell, a valve is a product which is used to constrict, cut off, redirect, or regulate the flow of a liquid or gas. While we do sell pneumatic valves we will be primarily focusing liquid, or solution, valves for this educational segment. Some common trade names associated with the valves we stock are as follows: butterfly, ball, gate, globe, angle, needle, solenoid, check, regulating, diverter, foot, relief, unloader, backflow prevention, and float valves.

    As with any product, it's crucial to identify the type of valve, the manufacturer, inlet/outlet size, operating and maximum pressures, solution temperature, and the solution passing through the valve. It's critical to know what solution is passing through the valve to ensure proper chemical compatibility. Knowing the solution's PH level can also be another important factor when determining suitable components and materials.

    How to Size a Valve

    We size valves similar to how we size pipe. Always measure the inside diameter of the inlet/outlet port. This will identify the size of the valve in question. A common mistake is that people measure the outside diameter of the inlet/outlet ports of a valve. There is one exception to this rule - if working with tubing - measure the outside diameter of the tubing. For hose and pipe, only pay attention to the inside diameter measurement.

    If flow rate is important, the coefficient of volume (Cv) of various valves can be compared. Now, I understand that sounds rather technical. However, in layman's terms all that means is the higher the Cv for a valve, the more flow rate will pass thru it with the same pressure loss. In the majority of applications, this will be a non-factor but it is still important terminology to be aware of in the vast world of valves.

    Manufacturer Identification & Valve Type Explained

    Most manufacturers will have a metal tag on their valve bodies to identify their brand. That manufacturer tag will identify the brand of the valve, the model, and serial number. This is an important first step in identifying what product you currently have. That being said, let's begin with a look at butterfly valves.

    Butterfly Valves

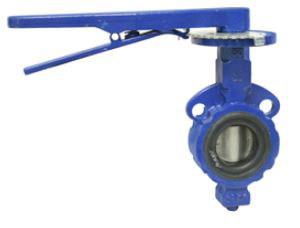
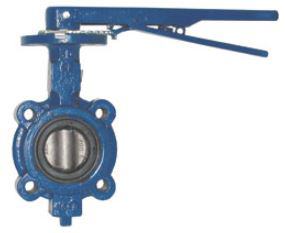
    Here at Dultmeier Sales, we stock a variety of butterfly valves. In the butterfly valve world, it's important to first determine which style of butterfly valve you possess. The two most common styles are Wafer or Lug bodies. A wafer-style butterfly valve has "thru" bolt holes that run along through the outside rim of both pipe flanges. In contrast, a lug-style butterfly valve has threaded bolt holes on both sides of the valve body to allow for "end of line" applications. Lug-style butterfly valves are, generally, less common than wafer-style butterfly valves. Below, you will see a wafer-style valve on the left and a lug style valve on the right:


    wafer style butterfly valve lug style butterfly valve


    Butterfly Valve Actuators

    Next, we get into the topic of valve actuation. We primarily stock butterfly valves that are manually (seen above with handle) or pneumatically actuated with either double acting or spring return actuators. A double acting butterfly valve actuator requires air pressure to open the valve and then air pressure to close the valve.

    A spring return butterfly actuator is used in fail-safe applications. If there is a loss of air pressure the valve will automatically close (or open) - due to the spring tension of the actuator. Spring return actuators are used in many production plants that require system flow to cease once power is cut or lost - as mentioned above, this is a fail-safe application example.

    Electric Actuators are also used in many industries. While we don't stock electric actuators for butterfly valves - we have access to them. Actuators can also be provided with "positioners", limit switches and other controls.

    We stock Butterfly Valves and Air Actuators from Keystone and Pratt.

    Ball Valves

    A ball valve is probably the most common type of valve that exists - across all industries. It gets its name due to the fact that it actually has an internal ball that sits in a "seat". When the handle or knob is turned 90 degrees from the inlet/outlet ports, the valve is closed and one can see the convex shape of the internal ball. When the handle is turned parallel with the inlet/outlet ports, the valve is open and one can view through it - unhindered.

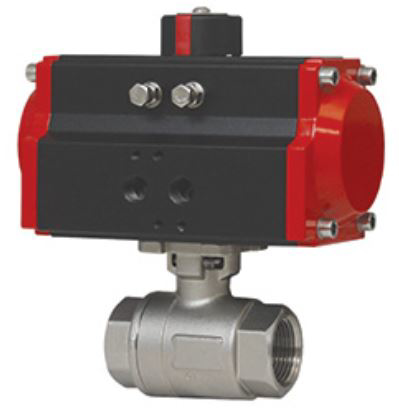
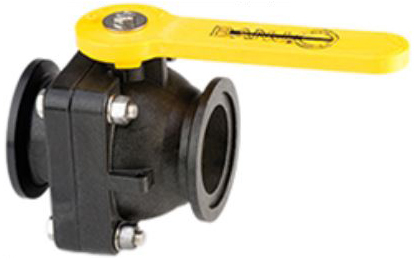
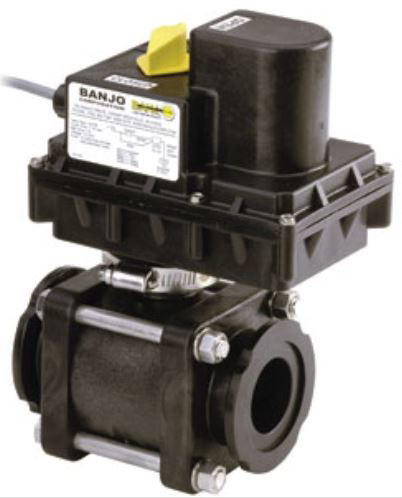
    On the left, below, is an example of an air actuated, stainless steel, female pipe thread, ball valve. While on the right, you will see a Banjo, polypropylene, manual, flanged, ball valve.


    actuated-ball-valve Banjo Stubby Valve


    Standard Port vs. Full Port

    By design, ball valves that are listed as Standard Port actually have less fluid path than the inlet/outlet ports size limitations - this is somewhat misleading to those that are unfamiliar with the concept of Standard vs. Full Port valves.

    For example, if you have a 2 inch Standard Port valve your flow characteristics will be closer to that of a 1.5-inch fluid path. The technical reasoning behind this is the fact that a smaller opening creates more friction loss (i.e. pressure drop) thus resulting in a decreased flow rate. Standard port ball valves are cheaper than full port valves but restrict the system flow rates; somewhat. So, if flow rates don't matter or affect your system then you can save money up front by selecting standard port valve(s) for your plumbing system.

    Full port valves allow the plumbing system to realize the full flow characteristics of the valving. If all valves in a system are two inch full port, valves then we can reasonably assume increased flow rates in comparison to a system that contains all standard port valving. A full port valve has a slight design change that allows for this increase in flow characteristics. While the valves may look the same externally, there are internal design changes that are not visible to the naked eye.

    High Pressure vs. Low Pressure

    This is another crucial step in determining the correct valve for a specific application. If necessary, place a pressure gauge at various points in the plumbing system to determine the system operating pressure. Never guess the operating pressure of a system. If a low pressure valve is installed into a high pressure system, serious or fatal injury could occur. As a general rule of thumb, anything below 150 psi is considered Low Pressure - that being said, there are valves rate for pressure less than 150 psi.

    This gets back to one of our core fundamentals when selecting a proper valve - determine operating pressure and maximum pressure for the intended plumbing system.

    Ball valves are a perfect example of how the same style valve can be used in multiple applications - both high pressure and low pressure. We have some ball valve product lines that have use applications which are limited to certain industries - due to their operating/working pressure limitations. However, we have many ball valve lines that carry over into multiple industry applications.

    While we do carry many products that can be cross-utilized in various industries we always want the customer to confirm an operating pressure. This ensures safety in application and use. Furthermore, it minimizes the possibility of injury and lessens the chance of damage to the valve and other plumbing system components

    Air Actuated & Electric Motor Driven

    We carry ball valves that can be remotely operated via automation, as well. The most common types are pneumatic (air-operated) and electric motor-operated ball valves. Air operated are most widely used in chemical facilities, fertilizer plants, or industrial plants. Electric ball valves are most commonly used in agricultural applications for spraying applications. The trade name electric ball valve or pneumatic ball valve simply refers to how the valve is actuated.

    When you drive down the road and see a large self-propelled sprayer, spraying in a field, you can be certain the booms are being remotely controlled. The boom valves are remotely controlled from the sprayer cab, with the help of electric ball valves. The sprayer operator sends a signal from his, in-cab, boom controller to turn certain sections of the sprayer boom on/off - based upon the field's specific application requirements.

    We also see electric ball valves in the turf industry. Golf courses or residential sprayers will commonly use this type of ball valve on their sprayer setups. It is more prevalent in the turf industry due to the fact that the booms are much smaller than the agricultural industry.

    Lastly, we do a fair amount of business in the liquid deicing industry. If you have ever seen a department of roads/transportation vehicle that is applying liquid before a winter storm - you have witnessed this industry in action. These vehicles are applying a solution called liquid salt brine (sodium chloride, magnesium or calcium chloride solution). Electric driven ball valves are common in this industry because pneumatic valve airlines would freeze in the frigid winter temperatures.

    For those interested, here is a link that further explains the process of creating the salt brine solution. Below is a picture of a pneumatic-operated ball valve, on the left. On the right you will see an electric-operated ball valve.


    Air Actuated Stainless Ball Valve Electric Banjo Ball Valve


    Gate Valves

    A flanged gate valve is used in larger flow applications. In the Dultmeier world, we most commonly see this style of valve used on large bulk fertilizer, fuel tank storage applications, and float storage tanks in the vehicle and fleet washing industry. Gate Valves are generally designed with a circular handle that is turned clockwise to close the valve and counter-clockwise to open the valve.

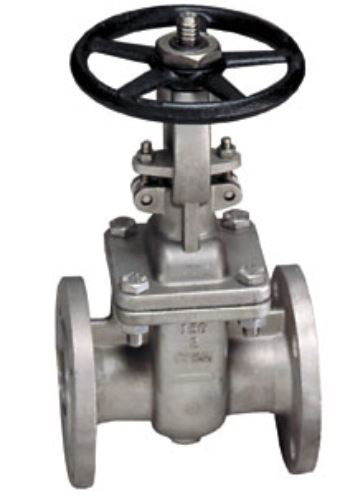
    Just as any other valve, we need to confirm the solution that will be passing through the valve to ensure chemical compatibility and then confirm the working or operating pressures that are required by the plumbing system. Most commonly, we are supplying flanged gate valves for lower pressure ranges. Below is a picture of a common flanged gate valve used in the bulk fertilizer industry.


    Gate Valve


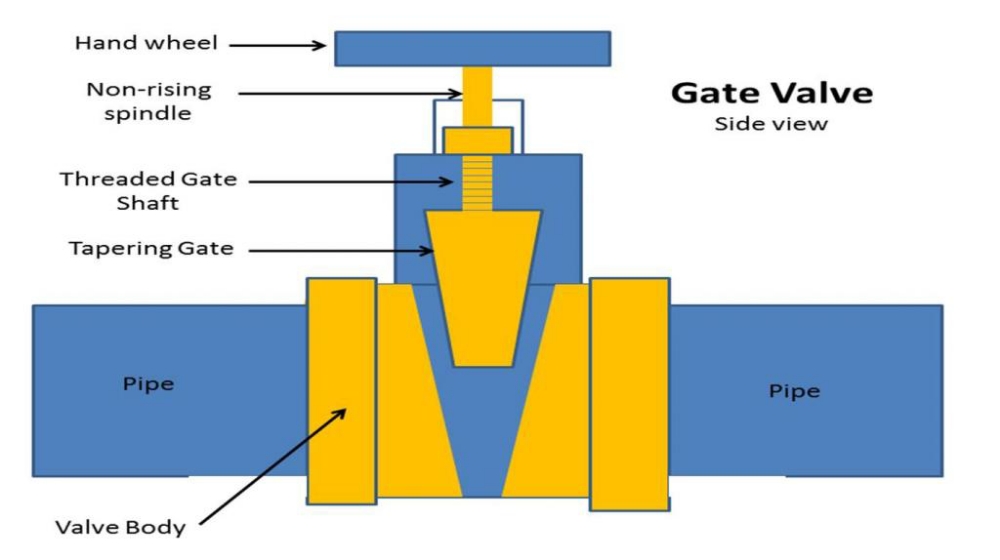
    Gate Valve Side View


    Globe & Angle Valves

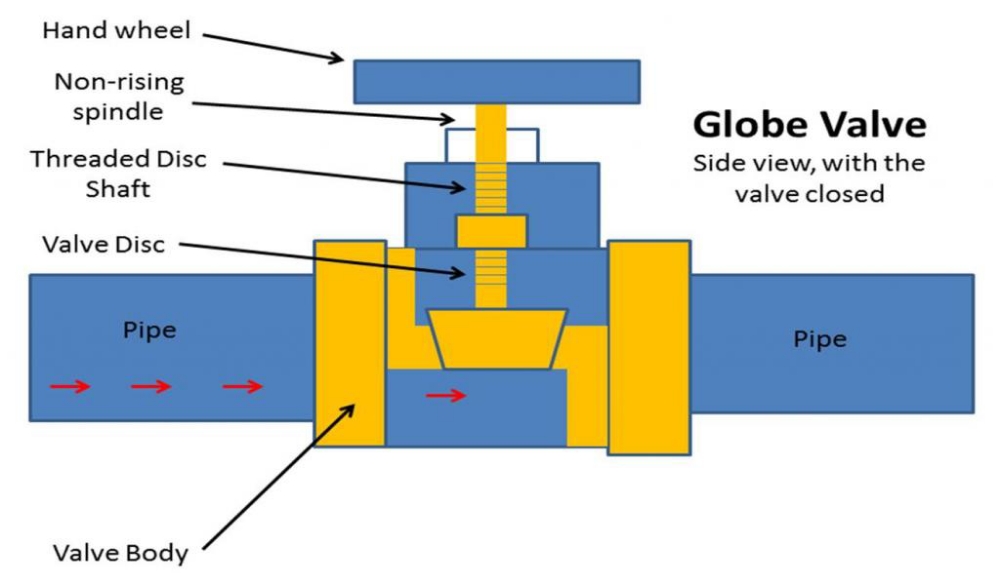
    A globe valve is very similar, from an external view, to that of a gate valve. However, when we look at the valves internally, they are quite different. As can be seen from the previous section, the gate valve operates almost like a wedge or slate that constricts or completely closes off flow. A globe valve has a different seat structure and more of a plunger that constricts or completely closes off flow. See below:


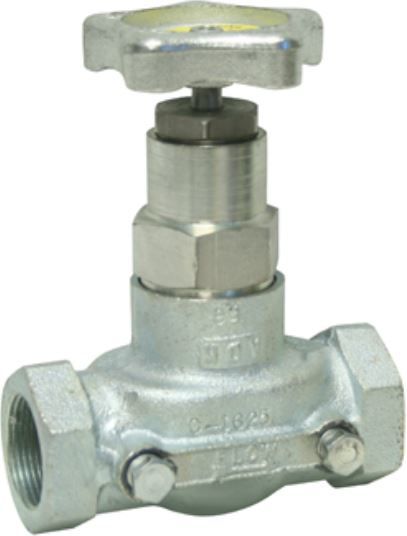
    Globe Valve Nh3


    Globe Valve Side View Cutaway


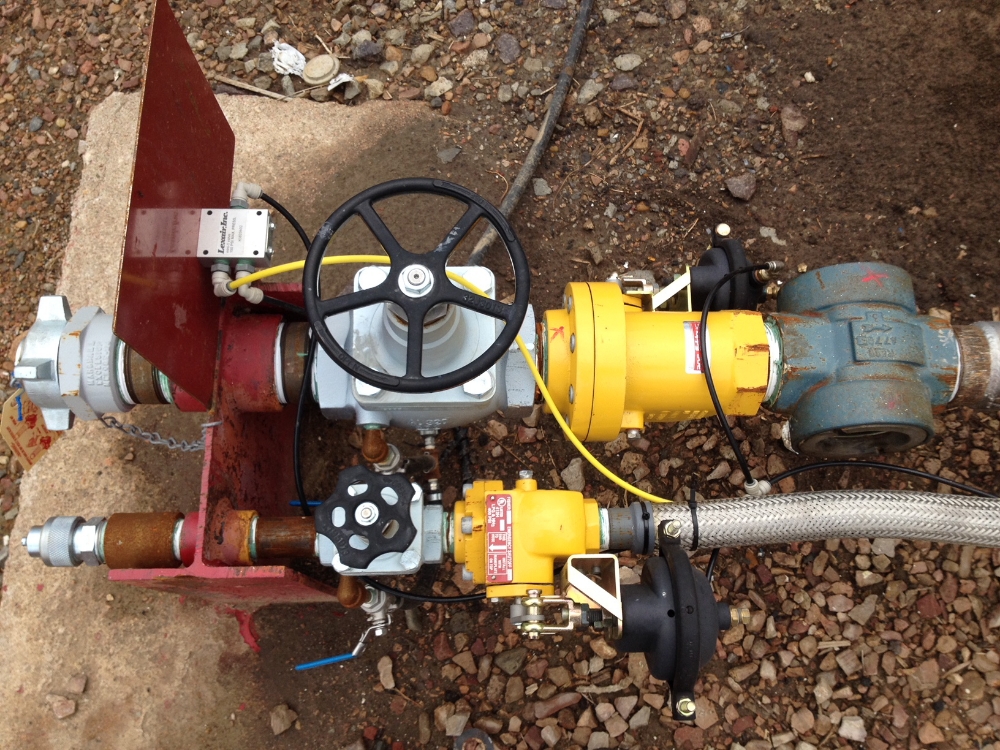
    Below is a photo of a couple different sized globe valves on an Anhydrous Ammonia application. These valves are for a receiving bulkhead system where a plant facility will offload large bulk transports into their bulk storage tanks. The larger valve is on the liquid line transfer and the smaller valve is on the vapor transfer line.


    Nh3 Globe Valves


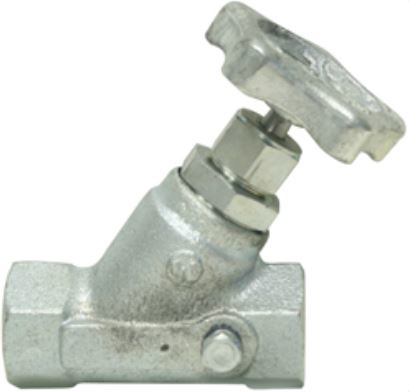
    In the Dultmeier Sales world, we most commonly use globe valves in the Anhydrous Ammonia industry. That is the same for angle valves. The most common application we see angle valves used in would be on toolbars or supply risers for Anhydrous Ammonia fertilizer applications. Continental Nh3 Products and Squibb Taylor are our two largest suppliers for these types of valves. An angle globe valve can be viewed below:


    Angle Globe Valve Continental Nh3


    Needle Valves

    Next up we will take a look into needle valves and the various applications they can be used for. Most commonly, we see these valves used in higher pressure applications such as car/truck wash and high-pressure cleaning. Here is a grouping of various needle valves on our website, to further illustrate the variety of options. That being said, we do sell a fair amount of needle valves in the Anhydrous Ammonia industry for a bleed off application.

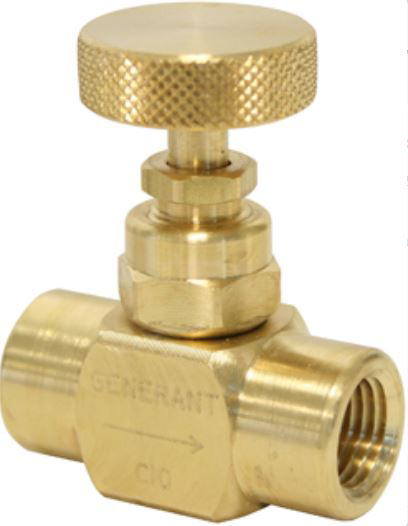
    As always, in any application we want to confirm the solution passing through the valve, working or operating pressure range, and temperature of the solution. Below you can view a picture of a needle valve.


    Brass Needle Valve


    Solenoid Valves

    We carry a wide supply of solenoid valves from a number of suppliers. The most notable brands we offer are GC Valves, DEMA, KIP, Kingston and more. A solenoid valve is another example of an electric valve. However, they are drastically different than electric ball valves. That being said, solenoid valves can be controlled remotely and are used in a number of industries.

    We most commonly use them in high-pressure vehicle or fleet washing applications, industrial applications, and agriculture or turf spraying applications. Some users in the agriculture industry are starting to migrate away from solenoid valves to ball valves - the primary reason being the necessity for the ruggedness of a ball valve versus over a solenoid valve. Mother Nature in combination with aggressive chemicals is an extremely harsh environment for a valve.

    Normally Closed vs. Normally Open

    This is an important topic to address - especially in the realm of solenoid valves. If a valve is "normally closed" it means that the valve is closed in its uncharged state. More simply put, if there is no electrical current passing through the valve coil then then it will remain closed. If a valve is "normally open", that means the valve is open in its uncharged state.

    Various applications will call for either style. Coils in these valves can be 12 volt, 24 volt, 110 volt and even 240 volt, which allows for a wide and versatile range of applications.

    For example, in the vehicle washing industry, we may want to have a weep application on a spray gun. We would do this to ensure the gun doesn't freeze shut in lower temperatures. Therefore, we want ambient water to continuously run through the system or spray gun - if a loss of power occurs. So, in this instance we would want to ensure a normally open valve be installed in this type of a plumbing system.

    Solenoid valves are still highly used in the car/truck wash industries due to the fact that they are generally stored in temperature-controlled environments while limiting exposure to the harshness of the natural elements.

    Check Valves

    Next up, we will look into the world of check valves. This product is used to prevent backflow of a solution in a plumbing system. For instance, a check valve would be utilized when pumping a solution up a vertical pipe and you do not want the solution to backflow, due to gravity, when the pump is turned off. A check valve is a form of backflow prevention.

    Furthermore, check valves keep a plumbing system charged. By keeping the system charged we can ensure more efficient delivery of product and reduce the number of air pockets that are present in the plumbing system, which reduces pump priming time and other potential pump problems. The more efficient a plumbing system is - the less it costs to keep it running.

    Types of Check Valves

    There are multiple types of check valves and each has its own benefits. We will briefly touch on the different types, here. First, is the most efficient type - in terms of maximizing flow characteristics. The swing check valve allows for maximum flow characteristics due to its design that reduces restrictions (i.e. a high coefficient of volume).

    Regardless of the check valve style, we need to remember the cracking pressure. The cracking pressure determines the PSI at which the valve opens. Therefore, if a check valve has a cracking pressure of 2 psi it will not open until the plumbing system generates an operating fluid pressure greater than 2 psi. Below is a cross-cut section of a swing check valve:


    swing check valve


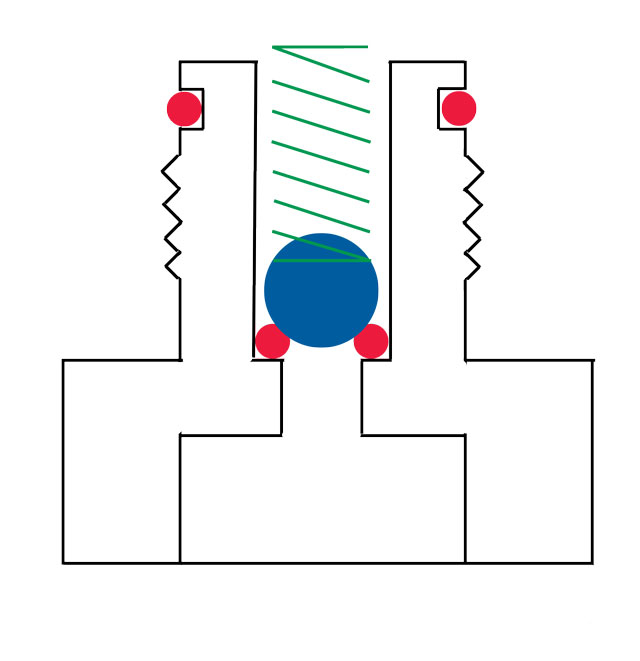
    Secondly, we have a ball check valve. This type of check valve has a preset mechanical spring that allows the valve to open based upon a pre-determined working pressure. These types of check valves are commonly used in high-pressure applications such as car and truck wash, but also within industrial and agricultural applications.


    ball check valve


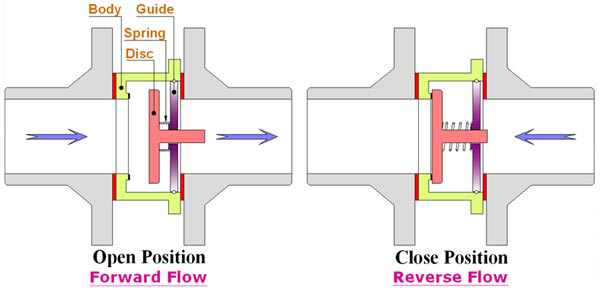
    Lastly, there is a plunger style check valve. This style is pictured below:


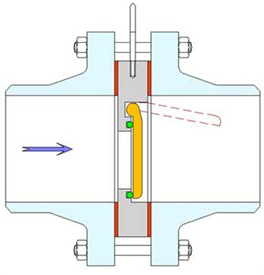
    Disc Check Valve


    Things to note when ordering a check valve:

    1. Operating and maximum pressure requirements
    2. Solution or product passing through the valve - check for chemical compatibility
    3. Cracking pressure
    4. Inlet/Outlet size
    5. Body type (wafer, NPT, flanged, etc)


    Shop Check Valves Now


    Regulating Valves

    A regulating valve can technically be any valve. In this sense, if you can constrict or control the flow by manipulating the opening threshold of the valve - you have just regulated the system flow.

    To that note, we are going to look at this section with this one caveat in mind - a regulating valve needs to be remotely controlled. To do this, let's first look into electric motor driven valves.

    There are certain types actuators of ball valves or butterfly valves that manipulate the flow rate of the solution by opening or closing the valve stem a to a certain degree. Without getting too technical this is done in conjunction with some type of flow monitor that is able to communicate with the valve actuator through a control mechanism.

    This control mechanism can be a simple rate controller in a sprayer cab or as complex as a computer dashboard in a chemical production facility. The regulating valve communicates to the flow monitor through the system controller to reach and/or maintain the desired flow rate. This controller can be a simple rate controller or a complex computer system.

    Regardless of the application - in order to remotely control a regulating valve we must have a controller that sends a signal to the valve based upon the desired flow rate of the operator.

    As always, any application we want to confirm the solution passing through the valve, operating pressure range, and temperature of the solution.

    Diverter Valves

    A diverter valve functions very similarly to a remotely controlled regulating valve. The main difference between a regulating valve and a diverter valve lies within the functionality. A diverter valve is designed only to guide product flow through a system. Therefore, the most common example of this would be a three-way ball valve.

    We look at this section with the same caveat in mind - a regulating valve needs to be remotely controlled. To do this, let's first look into electric motor driven valves.

    The diverter valve would be remotely controlled through a similar mechanism as a regulating valve. The main difference is that the diverter valve "diverts" flow down fluid path A versus fluid path B - based upon the desired location sent by the controller or computer.

    Foot Valves

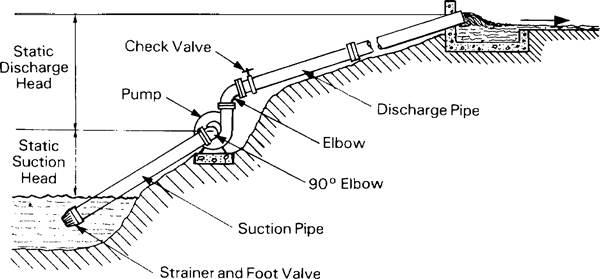
    Foot Valves are commonly used in transfer systems that require the pump to maintain it's prime. A foot valve is essentially a type of check valve. Foot valves are placed at the beginning of a suction line and are generally designed with some type of a strainer or screen to protect the plumbing system from sucking in foreign objects.

    If you recall the design of the check valve, you will remember that a check valve closes when there is backflow pressure applied on the spring check. This forces the valve to close and keeps the system suction line primed, with liquid - thus increasing the overall efficiency of the plumbing system. The less time it takes to prime the pump the more efficient the plumbing system becomes. Below you can view a diagram of a plumbing system that includes a foot valve, with strainer.


    foot valve diagram


    Relief & Unloader Valves

    Relief and unloader valves are commonly used in higher pressure situations with positive displacement pumps. These valves are used to protect system components from dead-head scenarios. A positive displacement pump will continue forcing product downstream in a plumbing system until there is a system failure such as a burst pipe, fitting, hose, etc. Thus, the term: dead head scenario. To help combat this scenario, relief and unloader valves were designed. Here is a diagram that explains a relief valve scenario


    Wash Diagrams


    This video will explain the difference between the two styles of valves. As always, Cat Pumps does an amazing job explaining content.


    Back Flow Preventers

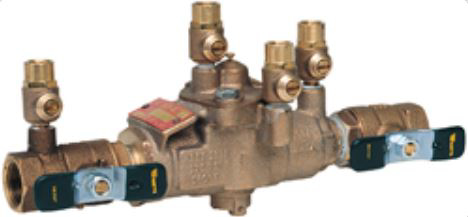
    In any wash down application where an operation has a water supply line connected to a public water source then it's absolutely necessary, by regulation, to have a back flow prevention valve in place. We distribute for Watts and commonly sell these units in vehicle/fleet wash applications, industrial applications and fertilizer/chemical facility applications. A backflow prevention system products the main water supply in the scenario where a local business would have a system failure and back up chemical, fertilizer, hazardous material, etc. into the main water supply - backflow prevention systems inhibit this scenario from taking place.


    Below is an example of a Watts back flow preventer

    Watts Back Flow Preventer


    Float Valves

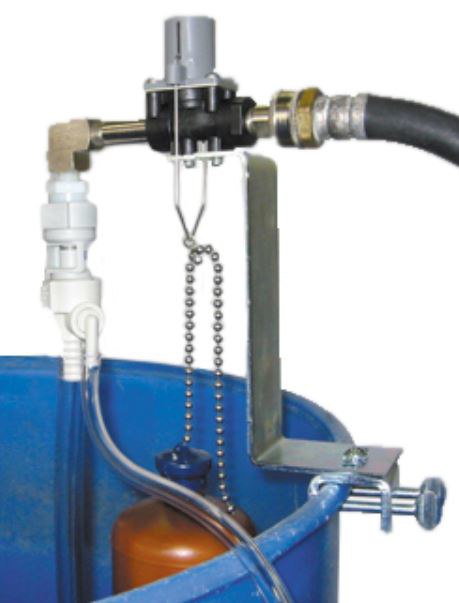
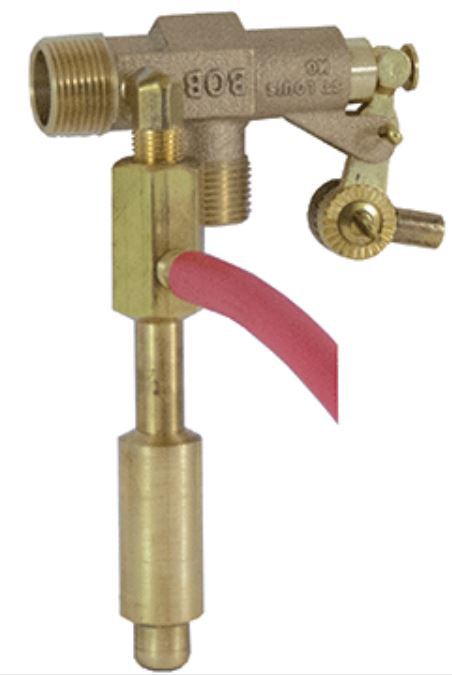
    Float valves are used in a wide array of applications. Virtually anywhere you need to maintain the level of a supply tank - you can leverage the assistance of a float valve. Some common float valve product lines that we distribute and carry include BOB Valves, Jobe Valves, Hydro Systems, Kerrick Valve, Dema, Walters Control, and Suttner.


    Below is a Dema liquid level proportioning control unit with a siphon breaker.

    Dema Liquid Level Control


    Another application that is extremely common with float valves is in the cattle industry. We sell a unit that allows the user to tie into a warm water source to keep stock tanks from freezing closed in frigid temperatures. The Ice Bull Automatic Ice Prevention System is engineered to automatically open when the stock tank water temperature falls below 42 degrees Fahrenheit.

    When the Ice Bull sensor valve opens, .20 gallons per minute of warmer water bypasses the float valve and flows into the tank through the discharge hose. Then, when the water temperature rises above 42 degrees Fahrenheit, the thermo valve shuts off. The Ice Bull Sensor is pictured below:


    Ice Bull Auto Ice Prevention System


    In Conclusion

    We hope that this has been a helpful guide to valves. While not all valve types are listed in this post, you have certainly enhanced your general knowledge and should be better prepared to choose the correct valve for your desired application needs.

    Don't forget to confirm in any application - the solution passing through the valve, operating pressure range, maximum pressure, and temperature of the solution and always confirm chemical compatibility.

    As always, thanks for stopping by and come back soon.

    (0) The Advantageous Upside to Pure Water

    What is Pure H2O?

    Crystal clean, pure, and without blemish. If all water entered our appliances, equipment, and food in it's purest form we would have a lot less headaches. Face it - hard water is tough - not just on equipment but on our bodies. If we can introduce pure water into a plumbing system it will accomplish things from reducing friction all the way to keeping maintenance costs lower. Fortunately, we can accomplish this through a process called reverse osmosis.

    Think about it this way - let's say you setup two equal plumbing systems but the only factor your change is the water hardness. If you are pumping water that has 450 Parts Per Million (PPM) in System A, versus water that has 10 PPM in System B - which system will outlast the other?

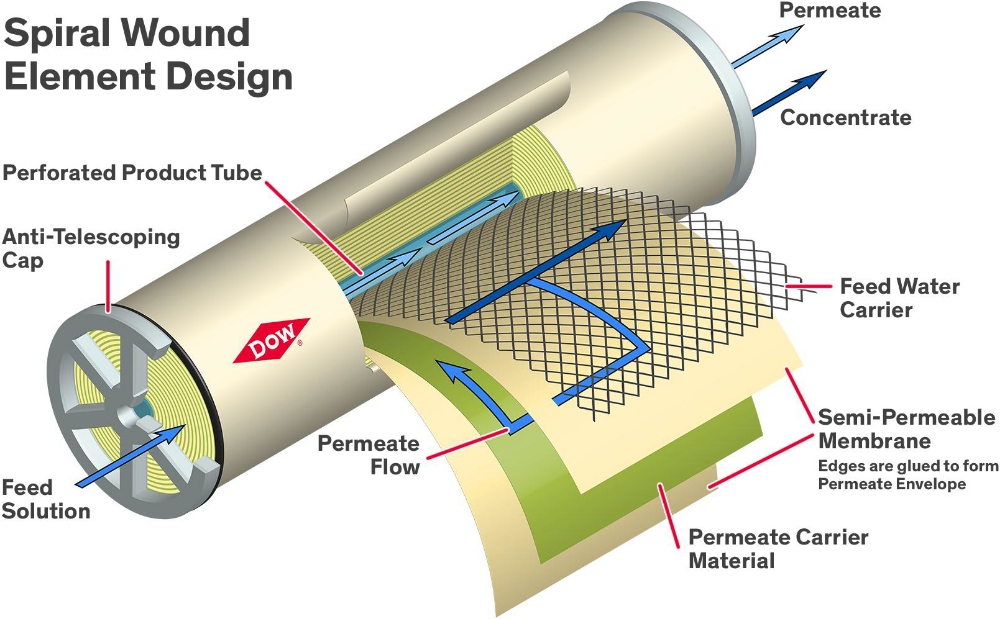
    I hope you guessed System B. Common sense tells us the less wear and tear we can put on mechanical pieces of machinery the longer it will last. Therefore, if you have hard water (water that contains more abrasive or suspended particulates) you are going to undoubtedly add to variable expenses in the form of increased operating costs - the upkeep of your equipment will require more routine maintenance and repairs - no way around it. Below you will see a cut-out view of a membrane used in reverse osmosis systems.


    Dow Reverse Osmosis Membrane Cutaway


    But what if I told you a simple investment, up front, could lower those variable costs and effectively keep more money in your pocket? You keep more money in your pocket by allowing your system to run more efficiently and lessen the likelihood of additional maintenance and repairs costs.

    Bottom line - if you can keep your system operating longer and minimize down time, whether that's scheduled maintenance or emergency maintenance, more money stays in your pocket.

    Determining Water Hardness

    Let's get into the heart of this discussion and throw some numbers out there. Water hardness is determined on parts per million. The EPA allows for 500 PPM in drinking water. Vehicle washing requires, a maximum, 50PPM.

    More and more greenhouses are beginning to monitor their water hardness, as well. Greenhouses and farmers across the country need to monitor their pH levels constantly. They do this to ensure that their plants are given the correct ratio of nutrients required to improve yields. By rigorously monitoring the purification of the water supply, an operator can ensure that a clear, and controlled, chemical reaction takes place with their soil matter.

    The process of reverse osmosis allows operators and farm/greenhouse managers to effectively oversee this chemical reaction - in a much more efficient manner.

    Reverse Osmosis & How it Works

    Reverse Osmosis is a process in which microscopic particulates are captured by an extremely fine membrane that allows the solute, in this case, water to pass through. This process is so effective that it can take water with 500PPM and reduce that number to less than 10PPM - and, in many instances we can do much better than that.

    This process is achieved through pressurization and, as noted above, extremely fine membranes or filters. The solute is retained on the pressurized side of the membrane and the solvent is allowed to pass through the membrane. The reason this process must occur under pressure is that the solution needs to be forced through the fine holes of the membrane. In many systems there will be multiple stages of filtration.

    The first filtration step will occur through an extremely crude manner. In many instances, the process will include a sand bed filtration that is gravity fed. This step is no more complicated than allowing the solution to percolate through a large sand bed - thus extracting many of the large particles that would clog finer filters and membranes - which are downstream in the plumbing system.

    The next stage typically involves another filter, or series of filters, that catch particulates and suspended particles that were small enough to pass through the sand bed -which is stage 1 of the filtration process. By implementing this second stage filter the process, in most instances, the solution is ready to actually pass through the finer filters/membranes - thus completing the reverse osmosis process.

    Prior to running the solution through the final filtration stages, it must be ran through a "booster pump" that creates the pressurized portion of the system.

    Once under pressure, the solution is ran through another membrane or series of membranes. Depending on the water hardness, it might be necessary to use a series of reverse osmosis membranes to reach the desired PPM the operation requires. Basic system components for a reverse osmosis system, used in the vehicle washing industry, can be viewed here.

    Upstart University Video Explanation

    Here is a video from Upstart University on how reverse osmosis can benefit farmers and greenhouse managers.


    For further product questions or inquiries about reverse osmosis systems and or replacement components and parts - don't hesitate to contact us or check out our website at Dultmeier.com - Thanks for stopping by and take care!

    (0) Mosmatic - Clear Sighted & Ground Breaking

    Mosmatic At a Glance

    The journey to an assured future. Look no further than Mosmatic Corporation. The Switzerland-based company specializes in the manufacturing of high-pressure cleaning equipment. With over 40 years of experience, Mosmatic has the common sense knowledge to back up their revolutionary solutions which serve a wide range of industry issues.

    The construction of a new facility in Bristol, WI has allowed Mosmatic to better penetrate the US market place. From high-pressure swivels to rotary nozzles and carwash booms - all the way to roof cleaners and gum removers - this company offers just about everything you need to keep your business clean and looking pristine. You can view our Mosmatic Manufacturer page here. This is one of Mosmatic's top videos - which clearly illustrates many of their product high-pressure cleaning offerings.


    Hurricane Pro

    The Hurricane Pro is highly popular. Not only is one able to clean underneath vehicles but it also allows the user to pivot the spray deck. This allows for multiple cleaning angles to get into tight crevices and blast debris free. This adjustable angle feature allows for an "all-around" cleaning of construction equipment, agricultural machinery, fleet vehicles, boats, and the list could go on - you get the picture. The Hurricane Pro is an extremely versatile undercarriage cleaner that is packaged into one sleek and high-quality model. Shop Mosmatic Now. This product can be used with either hot or cold water.

    Technical Data

    • Maximum Pressure - 4000 Psi
    • Maximum Temperature - 250 Degrees Fahrenheit
    • Inlet - 3/8"NPTF
    • Adjustable Spray Angles - 0 Degree to 90 Degree Spray Deck Adjustment

    Here is a product-focused video on the Hurricane Pro.


    High-Pressure Vehicle Washing

    Mosmatic is also a staple name in the high-pressure vehicle cleaning industry. From booms to swivels, spray guns, foaming products, and rotary wheel cleaners - Mosmatic offers just about everything one would need. The Mosmatic Wheelblaster Pro is a highly effective and versatile solution for just about any style or type of vehicle. Due to the nature of its design, there is no need to be extremely close to ensure a polished clean.

    The water pressure actually turns the rotor arm - so as long as there is water pressure the rotor arm is spinning - no added motors are necessary. Generally, the Mosmatic Wheelblaster Pro is found in automatic car wash facilities, but this product can be used for buses and fleet vehicles, as well.


    We hoped that you enjoyed this Manufacturer of the Month highlight. Mosmatic is a wonderful company that is seriously concerned with the quality of their products. No one says it better than their managing director, Patrick Rieben. "For us Quality is not just a slogan, but the bench mark for our efforts, priorities and goals."

    Take care and don't forget to stop by Dultmeier or give us a call at 1-888-677-5054. Thanks for dropping in.

    (0) How to Start a Car Wash Business

    Have you been pondering the idea of starting a car wash? Does the idea of passive income sound appealing? That's because it is. Do know that there is an extensive amount of upfront work and then there is the issue of ongoing maintenance. That being said, once you have an operational car wash up and running - you can consider it passive income.

    Everything You Need to Know About Starting a Car Wash Business

    The information below is a compilation of countless periodicals, customer surveys, and testimonials. At any point in the process of your new adventure, should you feel the need to ask about something in more detail don't ever hesitate to contact us. Let's dig into what you will need to do in order to properly align yourself to start a car wash.

    Car Wash Lot Selection

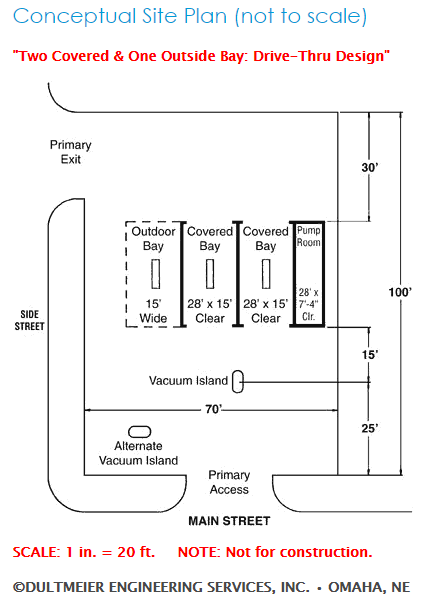
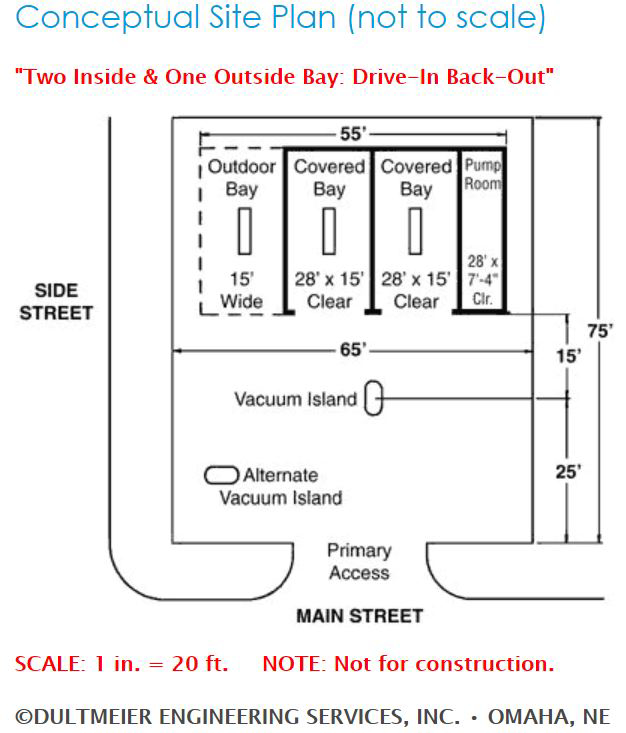
    A general rule to follow when sizing lot is that you will need a lot approximately 100 - 120 feet deep by a minimum of 75 feet wide - depending on the number of bays. Keep in mind a typical four bay self-serve car wash would need a lot 120 feet long by 100 feet wide - minimum. Another key attribute when selecting the ideal lot for your car wash is that it is accessible from both directions of traffic flow.

    For instance, if you select a lot that is on a one-way street it will negatively affect the volume your wash is capable of producing. The ideal traffic speed in the area of your lot selection should be around 40 miles per hour. This ensures that drivers have ample time to select your wash as their destination. The lot size and shape will determine if you design a "drive-in-back-out" or "drive-through" building.


    Free Catalog


    Data shows that income streams do favor the "drive-through" design. Lastly, when selecting your ideal location it is a good idea to target areas near residential neighborhoods, apartment complexes, or busy traffic routes. When determining if your ideal lot selection is a good fit for your business plan, you should consider the finances, as well.

    A safe rule to adhere to is that the cost of the property (monthly lease payment) should not exceed 15 - 20% of the gross monthly income of the wash. This ensures that you will not over-extend yourself, financially.


    Car Wash Site Plan


    Bay & Building Sizing

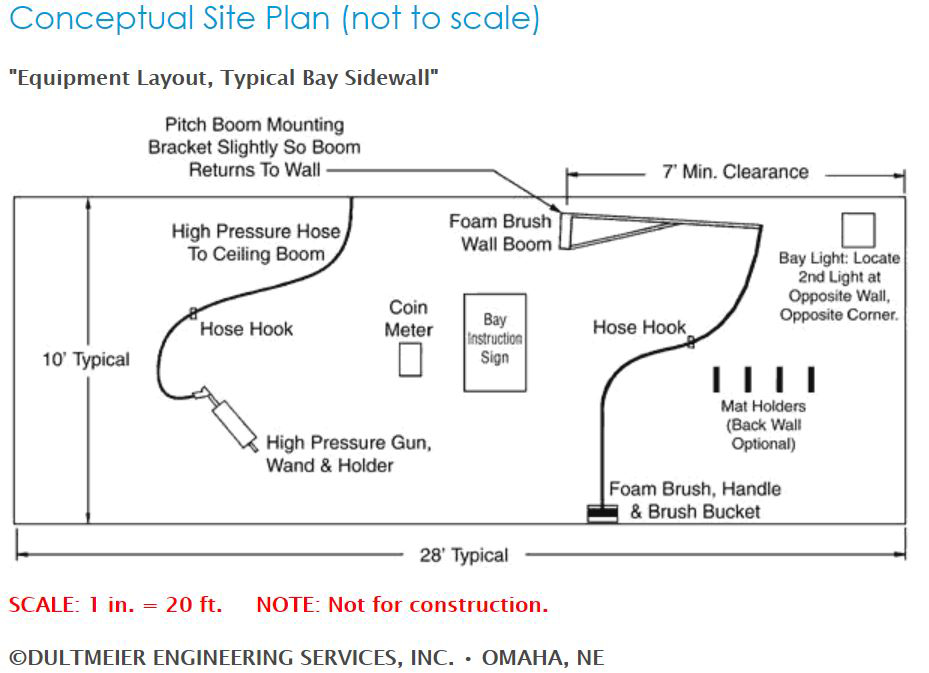
    An ideal bay is 16 feet wide by 28 feet long - these are the interior wall measurements. If you are planning a semi-truck bay make sure to account for internal wall measurements of 18 feet wide by 28 feet long. You can make a smaller bay work for trucks but why not just do it right from the start? The typical pump (equipment) room is 10 - 15 feet wide by 28 feet long (internal measurements).

    Furthermore, the typical bay height is 10 feet high for cars and 12 - 14 feet high for semi-trucks. Your lot size above will vary depending on what your overall wash purpose is (car vs. semi-truck) and the number of bays you intend to have. That's why we recommend determining the bay purpose and number of bays at the same time you are selecting your ideal lot location.

    Building Placement

    It's always best practice to consult local regulatory agencies to ensure your building is within code. That being said, your building should be situated on the lot to allow for one to two cars, minimum, to be parked behind each bay, waiting to wash. Vacuums should be placed in this area, as well, but should not be an impediment to the normal traffic flow into the bays. Another important concept to consider is that you ensure there are adequate drying and vacuuming areas.

    These areas should be out of the main traffic flow to avoid congestion. It is a good idea to allow for a southern exposure of your bays. This helps to reduce ice build-up in colder weather climates. Finally, make sure you plan for the "set-back" requirements on your building placement - this will vary with local ordinances.

    Inside vs. Outside Bays

    This aspect really does depend upon your market. Therefore, drive around and study the target market for the area which you have selected. That will give you a good idea of whether or not you need to have an outside bay or an inside bay. Washed located in a rural setting can be built with an open outside bay to accommodate trucks, trailers, and tractors. While this isn't required it can, and will, only allow for more traffic at your wash.


    How To Start a Car Wash Inside and Outside Bays


    Do keep in mind that an outside bay will bring in 50-60% of the revenue that an inside bay will. It is always better, from strictly a revenue standpoint, to enclose all bays and build one larger bay for semi-trucks - if you feel that your market will demand that. This larger bay can always be used for car traffic when an overflow bay is needed.


    Starting a Car Wash: Earnings & Costs

    Planning the financials for a self-serve car wash is essential for ensuring long-term profitability. Whether you’re considering opening a new location or optimizing an existing one, understanding projected revenue streams, costs, and features can help you make more informed business decisions.

    Revenue Projections

    Our experience tells us that it takes a population of about 1000-1500 people to support a single self-serve bay car wash. Therefore, one can conclude that a town of 5000 people will support a total of 5 self-serve bays - between ALL competitors. Given the current population level of the United States, the national average one can project roughly $2000/bay per month during peak traffic season(s). This is an estimated average - revenue can and will vary.

    The ideal number of vacuums to have is 1.5 vacuums per bay of service. Therefore, a three-bay wash should have four to five vacuums in an area of the lot that will not affect traffic flow. The national average per vacuum is approximately $200/vacuum per month. Again, revenue can and will vary.

    National averages of vending revenue are generally around the $400 per month range. This figure is based on offering at least four to five different vending products. Do keep in mind that revenue can be increased with multiple-product clear front vending machines.

    Operating Cost Projections

    One can expect that average operating costs are approximately 50% of gross revenue. This figure includes 13% for attendant labor, which may or may not be needed. Do note that lease payments, income tax, debt reduction or depreciation are not factored into this number. Furthermore, we must be clear that one should recognize these figures can and do vary from region to region.

    Options & Features

    A standard self-serve wash will offer hot wash/hot rinse in the winter and cold rinse in the summer. Additionally, hot or cold wax, foamy brush and spot-free rinse should be considered. Spot-Free rinse is an important feature. It increases revenue due to the fact that customers need to "buy" another cycle of time to get this feature. What does this mean? Double the income from each customer that decides to use this feature. Tire cleaner and pre-soak systems are also options that increase customer satisfaction and increase revenue.

    We highly recommend that instantaneous tankless water heaters be used in place of conventional water heaters. An instantaneous heater can reduce gas consumption by up to 40% in comparison to a conventional heater. For example, if it rains for an entire week, only the pilot light is using gas in the instantaneous tankless system. If only the pilot light is running that takes considerably less fuel, and therefore, less money - directly affecting your bottom line - in a positive way.

    Conversely, the conventional water heater will continue to heat the water regardless of demand. Think of it this way - the instantaneous heater only fires when water is needed, thus making the system much more efficient. Another important feature to consider is floor heat.

    Every cold climate wash should have a floor heat system. Floor heat systems reduce liability and increase customer satisfaction. An in-floor circulating system is the most popular design. That being said, above-head radiant tube heaters also give the benefit of heating the floor as well as the customer. Keeping your customers warm while they are in your bays will keep them happy and ensure they continue to come back as a repeat customer.

    It is wise to account for heating a three to four-foot area on the entrance and exit aprons of each wash bay. This will reduce customer liability in the walk areas as they use bill changers and vending machines. Ice will build up in colder climates and you want to ensure you do all within your power to mitigate injuries on your property.

    Another important topic to address is the use of proper signage. It is frustrating to use a wash that is poorly explained due to the lack of proper signage. Yes, many people will be able to figure it out. But, why let this be part of your customers' experience? Don't you want them to get exactly what they want out of your wash? Get in, get out, and have a clean and sleek finish. Here are some examples of car wash signs we offer.


    Car Wash Equipment Layout Site Plan


    Additional Revenue Streams

    Do not overlook vending products such as towels, Armorall, window cleaner and fragrance trees. These are additional revenue streams. Piggybacking off vending machines, every wash should have bill changers. This is an absolute necessity. Studies have shown a minimum 10% increase in gross revenues for washes that have bill changers.


    Pet Washing Station


    Another trending area that has taken off in the past few years is the addition of pet washes at car wash facilities. The demand is there and many people will wash their cars and pets in the same visit. This has been a profitable investment for our customers who have installed pet wash facilities at their locations. You can view some options here. As always, should you have more questions than can be answered by our website don't hesitate to contact us.

    (0) How to Rinse & Winterize Your Sprayer

    As winter approaches, it's essential to prepare your sprayer for the colder months ahead. Properly rinsing and winterizing your sprayer not only extends its lifespan but also ensures it will be ready for use when spring arrives. In this guide, we'll walk you through the necessary steps to rinse out your sprayer, protect key components, and prevent freeze damage.

    Step-by-Step of How to Properly Winterize a Spray Unit

    In order to begin you need to ensure that your entire system has been evacuated of the solution(s) you were spraying with the unit. That means you need to evacuate the pump housing, hoses, strainers, tank(s), spray wands, etc. Start at the tank and run through the entire plumbing system - no component of the system that comes in contact with liquid should be left out of this process. If something is neglected, odds are good that you will have issues when you go to start up next season. Let's avoid that at all costs. Here's how....

    Rinsing Your Sprayer

    Any system should be thoroughly flushed with clean water. Industry standards recommend a triple rinse. Add one-half tank of fresh water and flush all tanks, lines, booms, nozzles, wands, etc. for no less than fifteen minutes. Do this using a combination of agitation and spraying. Remember that rinsates (the solution you create while flushing your system) do contain residuals from your system. Therefore, any pesticides, herbicides, fungicides, etc. that you were spraying will be flushed from the system out of your orifice(s). Do not allow rinsates to flow into streams, rivers, ponds, lakes, floor drains, sewers, or sinks.


    Sprayer Wash Down Rinse


    It's best practice to use containment pads such as these to collect rinsates and then apply them to labeled sites at or below labeled rates. If possible, consider rinsing the system at the application site. Furthermore, the product label should specify best rinse practices - always consult the product label. Lastly, proper protective clothing should be worn to avoid chemical contact with any exposed skin.

    Remember, many of the chemicals out there are designed to kill living organisms - that means it's not good to get it into your bloodstream. If you do get any product on exposed skin make sure to wash the contaminated area with soap and water immediately, for no less than 15 minutes.

    Flush Out Sprayer Components

    This is also a good time to clean strainers of any debris that was picked up during the past season. By performing this task you will help ensure that you don't starve your pump and blow out seals when you start up next season. Here is another post on pump cavitation to further explain how detrimental this can be. Sloppy clean-up practices are a main cause of equipment failure or malfunctions. You're here to prevent that and avoid expensive downtime.

    You can create a cleaning solution by doing the following:

    1. Fill the tank with fresh water and the recommended cleaning solutions or tank cleaner.
    2. Agitate this solution for no less than 15 minutes.
    3. Add one of the following to 50 gallons of fresh water.
      1. Two quarts of household ammonia (let sit in sprayer overnight for herbicides such as 2,4-D or Dicamba. It's recommended to consult your label for recommended cleaning agents*)
      2. Or add four pounds of trisodium phosphate cleaner detergent. (It's recommended to consult your label for recommended cleaning agents*)
    4. Operate spray booms or wands long enough to ensure all lines and orifices are filled with the cleaning solution.
    5. Let the solution stand in the system for no less than three hours.
    6. Agitate and spray the solution onto suitable areas for rinsate solution.
    7. Add more fresh water and rinse the system again by using a combination of agitation and spraying.
    8. Remove strainers, screens, regulators, etc. and clean in a separate bucket of your cleaning solution.
    9. Rinse and flush the system again with fresh water.

    Don't neglect the fact that, any product left in the plumbing system, that is allowed to dry, is much more difficult to remove and will eventually build up enough to plug lines and orifices. Plugged lines and orifices not only decrease the overall efficiency of your plumbing system, but will bring about a slough of other headaches. Always wash down the external portion of the spray unit at the wash site, as well. This helps to remove any external residue that the unit collected via spills or drift.

    Making Sprayer & Sprayer Pump Repairs

    Next, let's move on to the pump itself. Remove the pump from the drive unit - generally on most skid sprayers this will be a gas engine. It's always best practice to take the pump completely apart BEFORE you order repair parts. For instance, you may order a complete overhaul kit and find that you really only needed to replace some gaskets. We strongly recommend to get the pump opened up and thoroughly inspect it.

    Once you have completed this and have drawn up your parts list - only then should you order repair components. We have an extensive parts breakdown file, to help you identify the correct parts you need. In order to use this resource you need to know the manufacturer, pump type, and model number. Click here for access to our Parts Resources. For additional resource videos see below.

    Hypro 7560 roller pump Repair Video: 


    Hypro D403/AR403 Pump Repair Video:


    Prep Sprayer For Storage

    If you absolutely need to store your unit outdoors over the winter make sure to remove all hose and any polymer (plastic fittings, connections, etc.) Some companies recommend adding lightweight oil such as diesel fuel or kerosene to a system for off-season storage. We don't recommend this as oil-based products don't like EPDM elastomers. For this reason, we suggest using a 50/50 mix of RV antifreeze and water. We recommend this treatment for your entire plumbing system - whether you store your unit indoors or outdoors.

    The reason we recommend this treatment is based on experience. We have had customers store units in temperature-controlled environments, during the off-season, only to have their heat source fail. This resulted in the pump housing cracking due to their own negligence. If they had charged the system with a solution that would not freeze they could have avoided an expensive surprise come spring.

    Here is another post on chemical compatibility and how it's worthwhile to perform due diligence. Run this solution throughout the entire plumbing system for a minute or two in order to ensure that your total system is winterized and safe from freezing.

    It's also recommended to remove all gauges and store them indoors if possible. Change out your oil if you are running a diaphragm pump unit - this ensures you are ready to rock-n-roll come go-time next spring. Remember, the main reason for failure or malfunction in any spray system is neglect and improper maintenance. Lastly, make sure to replace air/oil filters on your gas engine. Don't forget to add a fuel stabilizer treatment to your engine and run it for a few minutes to ensure the treatment reaches all internals of the engine.

    Before You Go

    If you can ensure following these steps in your post-season shutdown process we know you will be in much better shape come next season. All of your equipment should be good to go and ready when you - and more importantly - your customers need it to be. Thanks for stopping by and have a great off-season.

    Sources:

    1. Some of the information in this post was found through The University of Nebraska-Lincoln the Cleaning Pesticide Application Equipment publication from August 2013.
    2. Hypro - Pentair